 With a whopping 2.8 million apps in the Android store, we all can wonder how difficult it is for people who are trying to make a mark in the Android app store. The more the number of options users have in front of them, the stiffer the competition grows for these app developers.
Mobile apps have taken a giant leap over a period of past 10 years. They are loaded with a lot of features and they render an alluring tour to the offerings. Thus, helping users to save a lot of their time and energy consumed in doing the task that is just worth few minutes. Now that you have decided to develop your own mobile app, you need to make sure that you are well equipped and versed with the nuances of the craft.
To begin with let’s just divide the making of a mobile app into two parts; say, user experience(UX) and user interface(UI). Plus, before getting into the intricacies you need to get to know your targeted audience and market you are aiming at. Developing mobile apps is not about spending extravagantly on designing. All that matters is the incredible app interface that brings out the best out of your mobile app.
Moreover, it is expected that the success of a mobile app depends highly on the user experience. And a ‘bad’ user interface will lead to a bad experience causing the reason of the failure of the app.
I do not advocate that design and interface of an app will completely overshadow the actual essence of the app. However, an intuitive interface packed in an eye-catchy design will surely work as a booster in the conversion.
Interface design is an intermediary between the functionality of interfaces, and it is a key feature in the user experience design. If you are wondering that designing a user interface design needs your full attention then you are absolutely right!
To begin your work you need to set up your Android Studio Layout Editor to the following settings: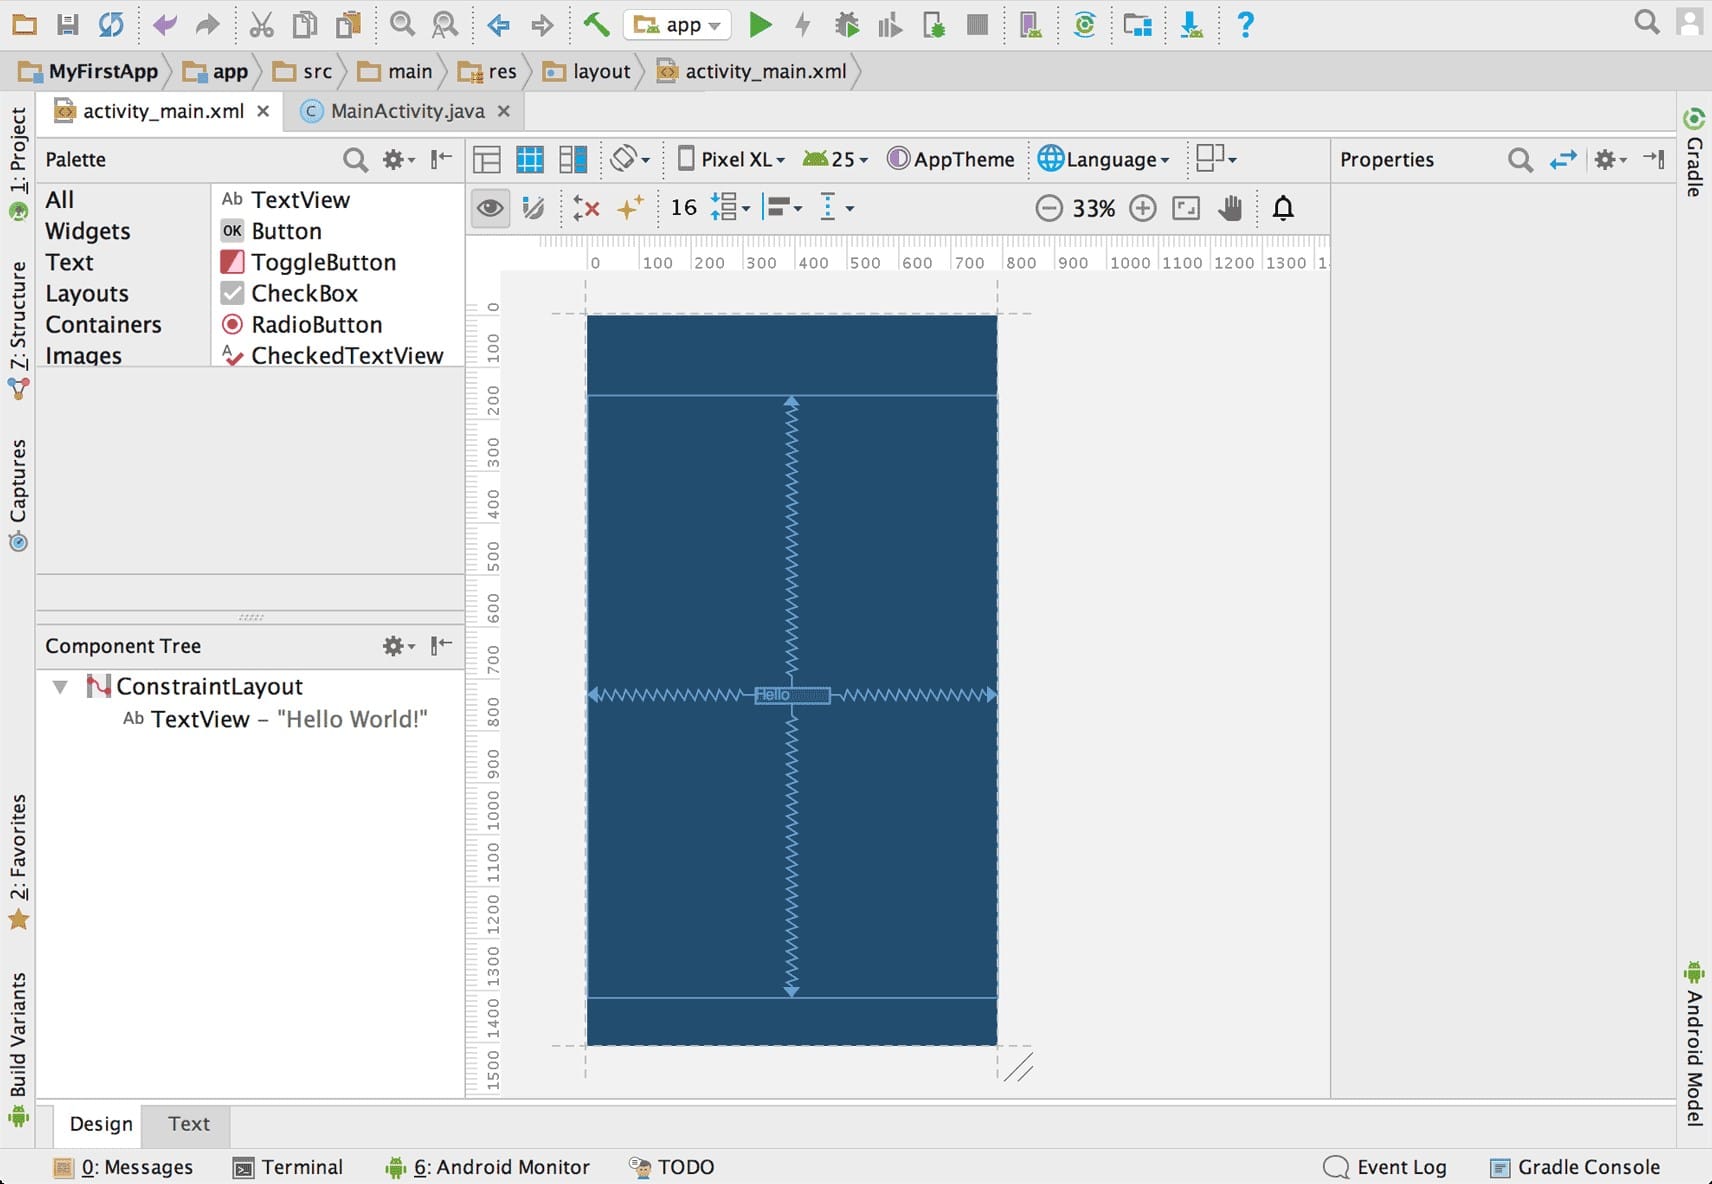
Move down to app > res > layout > activity_main.xml in your Android Studio’s Project window. To add space to your Layout Editor you can move on to hide the Project window. For this you need to select View > Tool Windows > Project (or you can even click Project option on the left-hand side of your Android Studio).
If there is an XML source depicted on your editor, then click on the Design tab present at the bottom of your monitor screen.
Then you need to click on the Show Blueprint option so as to look at the blueprint layout. Ensure that the Show Constraints option is on. The tooltip available in the toolbar must now read Hide Constraints.
Ensure to disable the Autoconnect. The tooltip available in the toolbar now reads Turn On Autoconnect. There is an option of Default Margins present in the toolbar and then you need to select 16 (it gives the designer to adjust the margin for different view later).
Click Device in Editor available in the toolbar and pick Pixel XL. On the bottom-left side of the window, you will get to see layout’s hierarchy of views known as The Component Tree window. In the picture, we the ConstraintLayout comprises of just one TextView object.
ConstraintLayout has defined the proper positioning for each layout view depending on the constraints applicable on the parent layout and to sibling views.This is the best way to create simple as well as complex layouts with the help of flat view hierarchy. The best part is that with this you do not nested layouts and thus saves a lot of time invested in drawing the UI. Now you can add components such as textbox and button accordingly.
Creating a responsive layout:
In order to make your layout flexible enough to fit into various screen sizes which mean responsive, you will have to stretch the text box stretch in order to fill the horizontal space left. You need to create constraint from the right-hand side corner of the button to the right-hand side of the screen’s parent layout. This will now be the total width available (which can be filled using the text box).
Likewise, you can incorporate constraint from the right-hand side corner of the text box moving on to the left-hand side corner of the button. You might feel that there is no need of the constraint there but this is equivalent to adding a bidirectional constraint between these views. This will constrain both the views to each other. This is known as a chain and it gives you options of some extra layout.
I hope these tips will help you to design a very great user experience and thus will in return work as a sales booster.
Author Bio:
Elley ALoy is a Professional Mobile App Developer works at Mobiers. Mobiers is a leading offshore android app development company , backed by a strong workforce of 150+ iPhone experts offering high-performance iPhone / iPad app development services to help you surge ahead of the competition.
More Mobile App Development and Related Articles:
- Hybrid Mobile App Development with PhoneGap, AngularJS and Bootstrap
- Getting started with AngularJS
- Angular 2 – Beginner to Professional
- Getting started with Bootstrap
- Beginners Guide to jQuery Mobile App Development
- Exploring the Difference between Google Play Store and Apple App Store
The post Design your Way Through 2.8 million Android Apps appeared first on Web Development Tutorial.