Quantcast
Channel: Interview Questions – Web Development Tutorial

MUST Have C# Interview Questions and Answers – Part 2

0
0

This C# Tutorial Part-2 in series of C# Interview Questions with practical and detailed answers. In previous part, we covered many basic to intermediate level interview questions on C# with the help of practical examples. I’ll recommend strongly to go through part-1 in this series. We will continue this series to provide more practical details with real time scenarios and complete source code to grasp C# language concepts. But this time, we are understanding in a different way by comparing different concepts.C# Interview Questions and Answers

C# Interview Questions PDF version will be available later for download.


Following Technical Interview Questions and Answers will also be helpful.


Start Date: Aril 01, 2017 12:00 AM PST
End Date: May 01, 2017  6:00 AM PST

Udemy Courses Online

Take All Online Courses – Lifetime Access

Complete C# Interview Questions List

Managed Vs Unmanaged Code

Managed Code:

The code (like Vb.Net,C#,J#) which is written in .Net Framework and developed by .Net Framework and under the control of CLR(Common Language Runtime). And the garbage collector run automatically in managed code.

Unmanaged Code:

The code which is developed outside of the .Net framework is called unmanaged code. Unmanaged code does not run under the control of CLR. Unmanaged code executed with help of wrapper class CCW (COM Callable Wrapper) and RCW(Runtime Callable Wrapper). C++ can be used to write such application.

Back to top

Struct Vs class

Structs and classes are the template or blue print that is used to create an object of a class.

Class Struct
Classes can be inherited Structs are not inherited
Classes are reference type Structs are value type
It could be null It could not be null
Class can be abstract It cannot be abstract
You can override the method within class You cannot override the method within Struct
  • A struct always contain public default parameter less constructor it can not contain the private parameter less constructor.
    struct A
    {
       private A()  // compile time error
           {    }
    }
    
    
    class B
    {
       private B()  // run successfully
    }
  • Static constructor is triggered in case of class but not in case of structure.
    struct A
    {
        static A() 
        {
            Console.WriteLine("This is Constructor A()");
        }
    }
    
    
    class B
    {
        static B()
        {
           Console.WriteLine("This is Constructor B()");
        }
    }
    
    class Program
    {
       static void Main(string[] args)
       {
          //Nothing happen
          A a =new A();                    
         
          //Will out put This is me a class
          B  b=new B();                           
    
          Console.Read();
       }
    }
    Output: This is Constructor B()

Back to top

Abstract Vs Interface

Abstract class and interface both are used to achieve abstraction (for hiding the functionality). Both contain the abstract method.

Abstract Class Interface
Abstract class contain both abstract and non-abstract method Interface contain only abstract method
It contain final, non-final,static,non-static variable It contain only static and final variable
Abstract class provides the implementation of interface It cannot provide implementation of abstract class
It does not support multiple inheritance Interface supports multiple inheritance
Abstract keyword is used to declare abstract class Interface keyword is used to declare the interface

Example of an Abstract class:

namespace ConsoleApplication
{
   abstract class A                  // contain method body
   {
      public int add(int a,int b)   
      {
          return a+b;
      }
   }

   class B : A       //classs B extends class A
   {
     public int mul(int a,int b)
      {
         return a*b;
      }
   }

   class TestMain
   {
      Static void Main(string[] args)
      {
         B ob=new B();
         int result=ob.add(5,10);
         Console.WriteLine(“result {0}”,result);
         Console.ReadLine();
      } 
   }
}

Example of Interface:

namespace ConsoleApplication
{
   interface A          // can not contain method body
   {
      void method();    //public abstract by default
   }

   class B : A          // class B implements interface A
   {
      Void mehtod()
      {
            Console.WriteLine(“Hello Welcome”);
            Console.ReadLine();
      }

      Static void main(string[] args)
      {
         B ob=new B();
         ob.mehod();
      }
    }    
}
Back to top

Boxing Vs Unboxing

In C# there is three types of data type Value type,Reference Type and pointer type. The process of the converting a value type into reference type is called Boxing. While the Reference type is converting into value type called unboxing.

Int a=5;
Object obj=5;    //Boxing
Int a=(Int)obj;    //Unboxing

Example of Boxing and Unboxing:

namespace ConsoleApplication1
{
      internal class Program
      {
         private static void Main(string[] args)
         {
             double a;
             object ref;
             a = 100;

             ref = a;            //Boxing - Value type to Object
             double result = (double)ref;   // UnBoxing - Reference Type to Value
             Console.WriteLine(Result);   // 100
             Console.ReadLine();  
         }
      }
}

Back to top

Method Overloading Vs Method Overriding

Method Overloading Method Overriding
Method Overloading is used for increasing the code readability Method Overriding is used for code re-usability
Parameter must be different Parameter must be same
It can perform within the class It occurs in two classes using inheritance (parent and child class)
It perform compile time polymorphism It perform runtime polymorphism
No special keyword to use for method overloading. It can perform simply within the class. Using virtual keyword with the base class method and override keyword with derived class method can achieved method overriding.

Example of Method Overloading:

namespace ConsoleApplication
{
    class Calculation
    {
        public void add(int a,int b)
        {
           Console.WriteLine(a+b);
        }
        public void add(int a,int b,int c)
        {
          Console.WriteLine(a+b+c);
        }
    }
    class TestMain
    {
       static void Main(string[] args)
       {
             Calculation ob=new Calculation();
             ob.add(5,10);
             ob.add(5,10,15);
       }
    }
}

Example of Method Overriding:

namespace ConsoleApplication
{
    class A
    {
        public virtual void Method()                                // Virtual method
        {
            Console.WriteLine("This is the Base Class");
        }
    }

    class B : A
    {
        public override void Method()                                // Overriding virtual method 
        {
            Console.WriteLine("This is the Derived Class");
        }
    }

    class TestMain
    {
        static void Main()
        {
           B ob=new B();
           ob.Method();//                   output:  This is Derived Class
        }
    }
}
Back to top

Break and Continue Statements

Break statement is used to break out of loop that’s mean you can jump out of loop at the current position and it terminate the loop.

Continue statement is used to (one iteration) jump over one iteration and again it continues the loop.

namespace ConsoleApplication
{
    class A
    {
        static void Main(string[] args)
        {
 
          int i;          
          for (i = 0; i <= 10; i++)
          { 
              if (i == 4)                // it jump out of loop where i==4  and start again from next value      
                  continue;
             
              if (i == 7)              // iteration stoped when i==7 and terminate the program
                  break; 
              Console.WriteLine(i);            
          } 
          Console.ReadLine();              
        }    
    }
}

Output:
0
1
2
3
5
6

Back to top

Constant Vs Read-Only

Constant and Read-only is the keyword that is used to make the field constant that can not be modified.

Constant Value:

Constant variable or local variable are assigned at the time of declaration they cannot be modified after the declaration. Constant variables are static by default hence you cannot use static keyword with the constant field (or variable).

public const int a=1;

ReadOnly:

A read-only field can be assigned either at the time of declaration or inside the constructor of the same class, that’s why read only field can be used run-time constant.

class A
{
  readonlyint a=1;
  readonlyint b

  public A(int a)
  {
    this.a=a;
  }
}

Back to top

Ref and out parameters

Ref and out parameters are used to pass an argument into a method. By using this parameter you can return more than one value.

In the case of ref parameter first you need to initialize it then pass to the method but for out parameter, you don’t need to initialize.

Ref:

The ref keyword is used to pass an argument as a reference. When the value of that parameter will be changed in the method, it will be reflected in the calling method.

It needs to be initialized before passing into the method.

class A()
{
    Static void Main()
    {
       Int a;     //need to be initialised
       a=1;

       method(ref a)
       Console.Write(a);
    }

    public static void method(ref int b)
    {
        B+=5;
    }
}

Output: 6

Out:

The out keyword is used to pass an argument same as ref keyword but in the case of out ref, you can pass the argument without assigning the value. Instead, it must be initialized in the called method before it returns back to the calling method.

class A
{
    Static void Main()
    {
        Int a,b;         // no need to be initialised
        Method(out a, out b)
        Console.Write(a);
        Console.Write(b);
    }

    Public static intmethod(out int n, out int m)
    {
       n=2;
       m=5;
       return 0;
    }
}  

Output:
2
5

Back to top

String Vs String Builder

String:

String is Reference type data type, you cannot insert, modify or delete any data when a string is created that means in simple word we can say that string is an immutable means once you created the object of string you cannot modify it when you try to modify it will create a new object in memory.

String s1= “Hello Jackson”;
String s1=”Hye Jackson”;      // created a new object

String Builder:

String Builder is an object of string to work with string we have to use a namespace(“Using System. Text) so unlike string, a string builder is an object and we can apply insert, modify and remove function in string builder without creating a new object, It will automatically update in memory does not create new space in memory. We can also say that string builder is mutable that’s mean changeable.

StringBuildersb=new StringBuilder();
sb.append(“Hello jackson”);
sb.replace(“hiijackson”);     //updating string memory

Back to top

Array.copyTo() Vs Array.Clone()

Array.copyTo () and Array. Clone() both areused to replicate the element of existing Single dimension array.

Array.copyTo:

Array.copyTo () method copy the array’s element into existing/destination array with the reference of targeted instance of existing/destination array. You can say that Array.copyTo allows to replicate the into specified index.

Array.Clone():

Array. Clone () replicate the existing element array in the new array object containing all element of exiting array without having any reference.

using system;

class copycloneexp
{
   public static void Main()
   {

      Int[] existingarray=new int[3];
      existingarray[0]=10;
      existingarray[1]=15;
      existingarray[2]=20;

      Int[] destinationarray = new int[existingarray.Length]
      existingarray.CopyTo(destinationarray,0); 
      
      int[] destinationarray1;
      destinatioarray1=existingarray.CloneTo() as int; // exp of array.cloneto()
   }
}

Back to top

Dispose and Finalise methods

Memory management is a big challenge when you are developing a web Application/software as we know that Garbage Collector plays the main role in .Net to manage unmanaged resource and Dispose and finalize method both are part of Garbage Collector.

Dispose and finalize method both are used to reclaim the memory used by the unmanaged resource.

Dispose method Finalize method
Unlike Finalize method it is not directly called by GC, User has to write code to implement it. Finalized method is automatically called by GC when any resource goes out of scope or at end of program.
It is a faster method and called by the user for instant object disposal. It is a slower method and automatically called by GC at end of,User can only override method when indeed.
Dispose method is the part IDisposable interface in GC Finalize method is the part of object class in GC
using System;
using System.Diagnostics;

public class A
{
   Stopwatch watch;

   public A()
   {
      watch = Stopwatch.StartNew();
      Console.WriteLine("Instantiated object");              // Instantiated object 
   } 

   public void ShowDuration()
   {
      Console.WriteLine("This instance of {0} has been in existence for {1}",this, sw.Elapsed);
   }

   ~A()
   {
      Console.WriteLine("Finalizing object");                 // Finalizing object
      sw.Stop();
      Console.WriteLine("This instance of {0} has been in existence for {1}",
                        this, sw.Elapsed);
   }
}

public class Demo
{
   public static void Main()
   {
      AClass ob = new AClass();
      ob.ShowDuration();
   }
}
Back to top

Late binding Vs Early binding
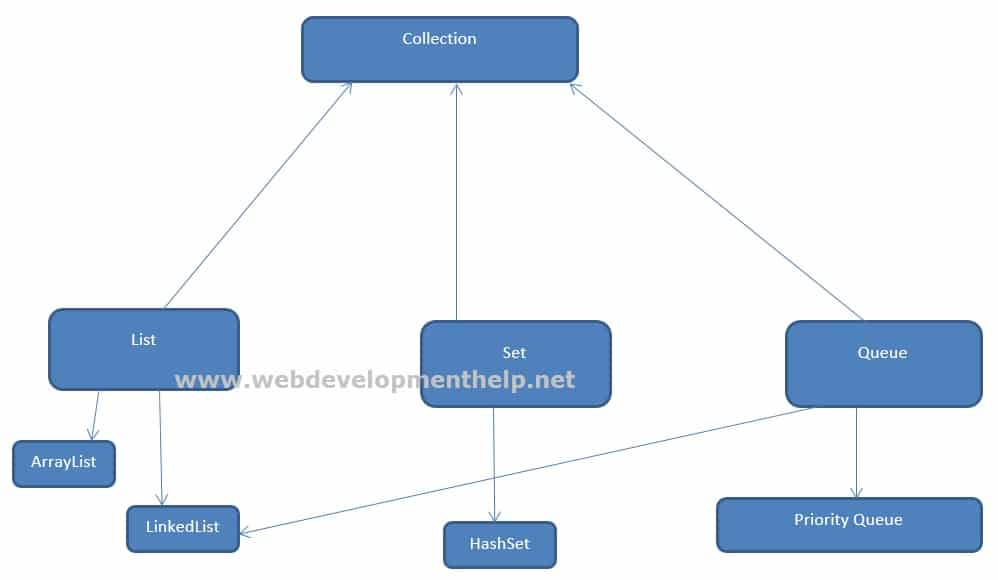
If the methods have same name and different parameter declare in a single class or methods have same name and same parameter but declare in different classes then it is called Binding or Polymorphism.

Late Binding:

It is also called runtime polymorphism; the situation arrives when methods are virtual and have same name and same parameter in different classes (must be derived class). Then it is called method overriding or late binding.

using System;  

public class Vehicle
{  
    public virtual void run()
    {  
        Console.WriteLine("Running...");  
    }  
}  

public class Bike: Vehicle  
{  
    public override void run()  
    {  
        Console.WriteLine("Bike is running safely...");  
    }      
}  

public class TestMain  
{  
    public static void Main()  
    {  
        Vehicle a= new Bike();       // object  id determined at runtime
        a.eat();  
    }  
}   


Output: Bike is running safely

Late Binding:

It is also called compile time polymorphism; the situation arrived when methods have same name but different parameter in same class.

It is also called method overloading.

using System;

public class A
{
  public void Sum(int a, int b)
  {
       Console.WriteLine(a + b);
  }

  public void Sum(int a, int b, int c)
  {
       Console.WriteLine(a + b + c);
  }
 
  static void Main(string[] args)
  {
     A ob=new A();                       // Object is determined at compile time 
     ob.Sum(5,8);
     ob.Sum(5,8,10);
  }
}

Back to top

IEnumerable & IQueryable

IEnumerable and IQueryable are used for data manipulation in LINQ from the database and collection.

IEnumerable IQueryable
It exists in System. Collections Namespace It exists in System.Linq Namespace
It is the best for query data from in memory collections like List, Array etc. It is best for query data from out-memory (like remote database, Service) collection.
It execute select query on server side, load data in memory on client side and then filter data. It executes select query on server side as well as filtered there.
Suitable for LINQ or Object and LINQ to XML queries Suitable for LINQ to SQL queries
It does not supports the custom query It supports custom query using Create Query and Execute method
It supports lazy loading that’s why suitable for paging It does not support lazy loading that’s why not suitable for paging
using System;
using System.Collections.Generic;
using System.Reflection;
using System.Collections;
 
namespace TesIEnumerable
{
    class A
    {
        public static void Main(String[] args)
        {
            IEnumerable<int> data = from value in Enumerable.Range(1, 10) select value;
            foreach (int a in data)
            {
                Console.WriteLine(a);
            }
            
            Console.ReadLine();
        }
    }
}


Output:
1
2
3
4
5
6
7
8
9
10
Back to top

Throw Exception Vs Throw Clause

Throw Exception Throws Clause
It is used to throw an exception explicitly It is used to declare an exception
It is used inside the method body to invoke an exception. It is used in method declaration(signature)
You cannot throw more than one exception You can throw multiple exceptions
Follow by instance variable Follow by exception class name

Throw Exception Example:

static
{
    try
    {
       throw new Exception(“Logical Error”);
    }
    catch(Exception ex)
    {
       console.WriteLine(“Error:” + ex.geMessage())
    }
}

Throws Clause Example:

public void method() throws ArithmeticExeption
{
  ArithmeticExeption ex = new ArithmeticException();
  throw ex;
}
Back to top

== Vs equals

The == operator compare the reference of the object while the equals compares the contents of the object see the bellow example.

namespace ConsoleApplication6
{
    class Program
    {
        static void Main(string[] args)
        {

           Object o1 = "Sachin";
           char[] c={'S','a','c','h','i','n'};
           
           Object o2 = newString(c);
           Console.WriteLine(o1==o2);            //compare the reference
           Console.WriteLine(o1.Equals(o2));     // compare the contents
          
           Console.ReadKey();

        }
    }
}

Output:
False
True

Back to top

Is Vs as operator

Is operator is used to checking the Object type and it returns the Boolean value true if the object is same otherwise returns false.

The as operator perform the conversions between compatible types.it is also work similar as Is operator but instead of return Boolean value it returns the object if they are compatible type otherwise returns null.

Example of Is Operator:

class A 
{}

class B : A
{}

public class IsOperator
{
    static void Main()
    {    
        A a = new A();
        B b = new B();

        Console.WriteLine(a is A);
        Console.WriteLine(a is Object);
        Console.WriteLine(b is A);
        Console.WriteLine(a B);
    }
}

Output:
True
True
True
False

Example of as Operator:

using System;

class A {}
class B : A {}

public class AsOperator
{
    static void Main()
    {    
        object[] objects = new object[6];
        objects[0] = new A();
        objects[1] = new B();
        objects[2] = "Hello";
        objects[3] = 12;
        objects[4] = 1.4;
        objects[5] = null;

        for (int i=0; i<objects.Length; ++i) 
        {
            string str = objects[i] as string;
            Console.Write ("{0}:", i);

            if (str != null)
                Console.WriteLine (str);
            else
                Console.WriteLine ("not a string");
        }
    }
}


Output:
0: not a string
1: not a string
2: Hello
3: not a string
4: not a string
5: not a string
Back to top

Array Vs Array List

Array Array List
Array is collection of similar data types that’s mean we can store only one data type either Int,string,char….etc. Array List is the collection of different data types that’s mean we can store all data types in array list.
The length of array is fixed Array list can decrease or increase dynamically as per usage
Array belongs to System. Array namespace It belongs to System. Collection namespace

Array Example:

namespace Example1
{
    class ArrayExample
    {
        static void display(int[] array)
        {
            Console.WriteLine("Elements of array are:");
            foreach (int i in array)
            {
                Console.Write("\t{0}", i);
            }
        }

        static void Main(string[] args)
        {
            int[] arr = new int{25,15,5,10};
            int i;
            // loop for accepting values in array
            for (i = 0; i < 4; i++)
            {
                arr[i] = Convert.ToInt32(Console.ReadLine());
            }
            ArrayExample.display(array);
            //sorting array value;
            Array.Sort(array); //use array's sort function
 
            ArrayExample.display(array);
            Console.ReadLine();
        }

    }
}

Output: Elements of array are:
5  10  15  25

ArrayList Example:

using System;
using System.Collections;

class Program
{
    static void Main()
     {
        ArrayList list = new ArrayList(); // Create an ArrayList with four strings.
        list.Add("USA");
        list.Add("London");
        list.Add("Brazil");
        list.Add("India");
       
        list.Sort();  // Sort the ArrayList.
        foreach (string value in list)
        {
            Console.WriteLine(value);
        }
        
        list.Reverse();    // Reverse the ArrayList.
        foreach (string value in list)
        { 
           Console.WriteLine(“Reverse  Arraylist…………..”)
            Console.WriteLine(value);
        }
    }
}

Output:
Brazil
India
London
USA
Reverse  Arraylist…………..
USA
London
India
Brazil
Back to top

Directcast Vs ctype

Directcast cType
Directcast is generally used to cast reference data type. It is used to cast value type.
To perform the Directcast between two different classes, the classes should have relationship between them. To perform ctype b/w two different value types, relationship is not required. If the conversion is legal it will be performed.
When you perform Directcast on arguments that do not match it will throw InvalidCastException. Exception is not thrown while perform ctype.
Performance of Directcast is better than ctype because there is no runtime helper routines of VB.Net are used for casting. It requires runtime helper routine of VB.Net hence performance is slow that Directcast.
Directcast is portable across many language that’s mean it is not specific to VB.Net Ctype is not portable it is specific to VB.Net.

Directcast Example:

Object exp = ”public keyword is access modifier”;
String exp1 =(string) exp;
Object exp2 = exp1;
Object exp3 = (object) exp1;

Type Cast Example:

TextBox exptype=(TextBox)obj;
Where obj is  Typecast

Back to top

Public Vs Static Vs void

Public: public keyword is access modifier and tells the c# compiler that the Main method is accessible by anyone.

Static: static keyword declared that the Main method is global and can call without creating an instance of the class.

Void: void keyword is used to specify that the Main method does not return any value.

Example of public and static keyword:

using System;

namespace staticexample
{
    class A
    {
        public static int a;             // static variable can be initialised out side of member function
        public static void display()     // static and void method means no return type
        {
            a=10;
            Console.WriteLine(a);
        }
        public void demo()            //  public and void method means non return type
        {
            int b=20;
            Console.WriteLine(b);
        }

 
        static void Main(string[] args)
        {
            A obj = new A();
            A.display();              //calling display method through class name
            obj.demo();               //calling demo method using instance of class
            Console.Read();
        }
    }
}

Output: 10
        20
Back to top

Top Technical Interview Questions and Answers Series:

Top C#.NET Jobs [Updated Daily]

Top ASP.NET MVC Jobs

ASP.NET Developer, 100% remote
Source: Indeed
Details: Core development tools are C#, ASP.NET 4 & 4.5, ASP.NET MVC 5, Web-form knowledgeable, NUnit, CSS, HTML, Entity Framework 6, SQL Store Procedures, jQuery, SQL...  More
30+ days ago

Remote 23-January-2017

Senior .Net Developer
Source: Indeed
Details: Extensive Experience with NET OData, ADO.NET, LINQ, Entity Framework, ASP.NET MVC and ASP.NET Web Services. Strong SQL skills and familiarity with MS SQL Server...  More
3 days ago

Redmond, WA 06-April-2017

Senior Web Developer
Source: Indeed
Details: Net development tools. Asp.net mvc 3 or higher with Razor view engine. Indeed Hire is in partnership with MBM Inc....  More
2 days ago

Rocky Mount, NC 07-April-2017

Senior Full Stack .NET Web Developer
Source: Indeed
Details: ASP.NET MVC 4/5+:. 3+ years demonstrated experience in ASP.NET MVC 4/5+. Graphic Products is seeking a Senior Full Stack .NET Web Developer to join our Web Team...  More
5 days ago

Beaverton, OR 97005 04-April-2017

Senior Web/Application Developer
Source: Hobart Brothers Company
Details: BASIC DESCRIPTION: We are in search of a talented and energetic developer who will be responsible for solving the complex challenges presented by diverse  More
10 days ago

Troy, OH 45373 30-March-2017

.NET Developer Web (mid-level to senior)
Source: Indeed
Details: Angular2, ASP.NET, MVC, Gulp, Ruby. At EZ Prints, we make personalization possible for any online consumer with a full spectrum of technology, printing, and...  More
18 days ago

Norcross, GA 30071 22-March-2017

Application Developer
Source: TWO MEN AND A TRUCK®
Details: Application Developer Lansing, MI (Corporate) Summary: The Application Developer works as part of a team to develop and maintain web and client server  More
3 days ago

Lansing, MI 48911 06-April-2017

Microsoft Application Developer
Source: Indeed
Details: .NET, ASP.NET, MVC, Web Application Development Essential*. Bachelor’s Degree in Computer Science or MIS....  More
8 days ago

Rosemont, IL 60018 01-April-2017

Senior Software Developer .NET ASP.NET MVC
Source: Indeed
Details: Build new applications with .Net (C#) & ASP.NET MVC – heavy focus on client web portal. Reporting to the Vice President, Technology, the Senior Software...  More
9 days ago

New York, NY 10006 31-March-2017

Senior Web Developer
Source: Veson Nautical
Details: Exceptional coding and design skills, proficiency in ASP.NET MVC with C#, SQL, HTML5, JavaScript, jQuery, CSS3/SASS, and Single-Page Application Frameworks....  More
30+ days ago

Boston, MA 02116 09-March-2017

.Net Application Developer
Source: Indeed
Details: MUST HAVE: GREEN CARD OR U.S. CITIZEN NO CORP TO CORP Must be local to St. Louis, MO .NET Application Developer Are you a resourceful and motivated  More
13 days ago

St. Louis, MO 27-March-2017

Software Application Developer
Source: Indeed
Details: C#, MVC, HTML/JavaScript/CSS for designing and developing applications, UI, interfaces and web services. Builds new solutions with one or more of ASP.NET, MVC,...  More
15 days ago

Cincinnati, OH 45241 25-March-2017

Sr. Application Developer (C#, Angular.JS, Linq)
Source: Indeed
Details: C# .NET 4.0/4.5 (ASP.net, MVC, Web services (REST), Entity Framework, LINQ, Dependency injection). Sr....  More
16 days ago

Allentown, PA 24-March-2017

Full Stack Developer
Source: DISYS
Details: Proficiency with C#, ASP.NET MVC, EntityFramework, ADO.NET. Are you an experienced front-end developer who can deliver high-performance, intuitive UI design and...  More
11 days ago

Everett, WA 29-March-2017

Mobile Application Developer
Source: Indeed
Details: HTML5, CSS, JavaScript, jQuery, AJAX, ASP.NET, MVC, AngularJS, ReactJS, Meteor. DOE*....  More
19 days ago

Atlanta, GA 21-March-2017

Senior-Level Software Application Developer
Source: Indeed
Details: This is some of the most exciting .Net development going on including interesting ingredients such as C#, MVC, Angular, Azure automation, SSO, and more....  More
23 days ago

Nashville, TN 37203 17-March-2017

Mid to Senior level Demandware Developer
Source: createch
Details: Experience with web frameworks that implement MVC design pattern (Spring, Struts, Stripes, ASP.NET MVC, etc.). Mid to Senior level Demandware Developer....  More
24 days ago

San Francisco, CA 16-March-2017

Senior Software Engineer
Source: Patriot Software
Details: AngularJS, JavaScript , jquery, ASP.NET MVC. Use your extensive programming skills and problem-solving abilities to help Patriot Software, LLC build awesome...  More
2 days ago

Canton, OH 07-April-2017

Senior Software Engineer, Ed-Fi Alliance - Austin, TX
Source: Michael & Susan Dell Foundation
Details: The Ed-Fi Alliance is currently interviewing for a Senior Software Engineer to lead the efforts to support and enhance its core technology. This role reports  More
2 days ago

Austin, TX 78746 07-April-2017

Senior Full Stack Software Engineer
Source: MaxPoint
Details: Experience with ASP.NET, MVC, C# and/or Java. Senior Full Stack Software Engineer....  More
2 days ago

Austin, TX 78759 07-April-2017

Senior Full Stack Developer
Source: Indeed
Details: *Job Title: * Senior Full Stack Developer *Job Summary* * Under the general supervision of the Site Director, the Senior Full Stack Developer will join a  More
27 days ago

Modesto, CA 13-March-2017

Web Developer
Source: Indeed
Details: Required Qualifications: Ability to work in a dynamic environment and deal with ambiguity3-5+ years of experience designing complex web applications in ASP  More
3 days ago

Redmond, WA 05-April-2017

Senior C#/.NET Full Stack Developer
Source: Graphic Products
Details: 3+ years demonstrated experience in ASP.NET MVC 4/5+. We are looking for a Senior Full Stack Developer responsible for the ongoing development and advancement...  More
30+ days ago

Beaverton, OR 97008 09-March-2017

Lead .NET Developer – loan origination
Source: Indeed
Details: ASP.NET MVC, jQuery, JavaScript, JSON. C#, ASP.NET MVC, jQuery, JSON, AJAX, SQL Server, Entity Framework, responsive, mobile, etc, Envision product development...  More
1 day ago

Dallas, TX 75235 08-April-2017

Senior .NET Software Engineer
Source: LSQ
Details: Experience with ASP.NET MVC, HTML, CSS, JavaScript, and AJAX. Senior .NET Software Engineer....  More
10 days ago

Maitland, FL 30-March-2017

The post MUST Have C# Interview Questions and Answers – Part 2 appeared first on Web Development Tutorial.


MUST Have Core Java Interview Questions

0
0

Another article in series of Technical Interview Questions and Answers on Web Development Tutorial covering Core Java Interview Questions this time. You will find more detailed answers to mostly asked interview questions during a technical interview. Java Interview Questions and Answers

Java Interview Questions PDF version will be available later for download.


Following Related Technical Interview Questions and Answers will also be helpful.


Complete Java Interview Questions List

Courses Online

What is object oriented programming. How java differs from other object orienting programming languages like C++?

Object oriented programming, primarily known as OOP, is a programming paradigm, which simplifies the development of software using some key concept provided to make development easier and faster.  An object is something that has state and behavior. An object can have data, fields, methods. Objects can talk, access to other objects. Access would be granted based on the modifiers. A class in OOP stores information and demonstrate the information using methods, so class is basically blueprint of an object.

Let’s talk in brief about different components of Object Oriented Programming:

  • Object
  • Class
  • Encapsulation
  • Abstraction
  • Polymorphism
  • Inheritance

Object:

Object is something that has state and behavior. We can easily relate object to some real world objects like machine, car etc.

Class:

Class is basically a logical collection of objects. That can have multiple methods, variables encapsulated in it.

Encapsulation:

As the name suggests, encapsulation is basically to encapsulate multiple logically related things together in an entity that is called class and provide proper access modifiers to the variables, so that these can not be accessed directly from outer world.

Abstraction :

Consider a scenario, where you are writing some logic that you don’t want to expose to outer world, so we just expose declaration of the thing to outer world with help of interfaces so that the implementation will be completely hidden from outer world, Like we have a code that checks if   an number is palindrome or not, so we need not show our logic to calling code. We will just create an interface which will have a method and takes a parameter of which will a number and return a boolean based on our computation.  This is called abstraction, where the calling code does not know anything about the implementation.

Polymorphism :

If we go by definition, polymorphism means one name many forms. The same we apply while writing code in a language that is object oriented. So practically we create methods that have the same name but differs in parameters, it is called polymorphism. Where a single method name have more than one implementation. In java we use concepts like method overloading and method overriding to achieve the same.

Inheritance:

Whenever we write code, we always think of re-usability or extension of the code that is already written. So in inheritance an object takes all or some properties of the class that is parent to this.

We will talk in detail about these concepts. This is very basic overview about Object oriented programming and object oriented programming concepts.

Now lets talk about Java, so Java is an object oriented programming language that is extensively used in software world to create highly secure, robust software.

The main and most important feature of java that make it differ from other OOP programming languages is that Java is platform independent. When we say platform independent then it means write once and run anywhere. Java compiler creates a byte code that can be executed across JVM’s that can be Linux, that can be Windows, that can be MAC and so on.

If we talk about some key differences between C++ and Java then, although both languages are object oriented programming languages but still there are some key differences between these two :

  • C++ is platform dependent language, whereas Java is platform independent language.
  • C++ support multiple inheritance, whereas java removes multiple inheritance, since it can cause DOD that is Diamond of Death problem.
  • Pointers, C++ has support for pointers, Java also has support but java internally uses pointers. Programmer doesn’t have to write pointer code explicitly.
  • C++ does not have multithreading support, whereas Java provides support for multi-threading.

And so and so on, there are many differences between these two languages but these are the key ones.

Back to top

Explain installation and environment setup of java. Briefly explain what is JRE,JDK and JVM?

First we need to download the executable file from http://www.oracle.com/technetwork/java/javase/downloads/index-jsp-138363.html as per our operating system. One done with download the executable file , run the file and it will install java to our system and on successful installation the folder structure will look like this:Java Installation

So we have downloaded and installed the Java Development Kit and we are ready to go to code. Before processing forward we need to set the environment variable so that when we run java from command prompt operating system will aware what kind of program to run.

To achieve this, we need to traverse through the path below:Java Path

Now click on Advance system settings link that is on the left pen of this page, this will open a window like this:Java Environment Variables

Now clink on the highlighted one, that is Environment variables. Upon clicking this a new window will open, under this , click on new under System Variables and create a new System Variable and name it to JAVA_HOME, against variable value we need to path of java installation directory that is with my system is:

C:\Program Files\Java\jdk1.7.0_79.

Lets set this and see how it looks:Java Home Setting

Click on OK button and we are done with creating a new system variable JAVA_HOME. Next step is to add this variable to path. Under the same system variables there will a variable path, edit it and add JAVA_HOME to path.

That’s it we are good to go to write our first java code. Lets check with command prompt if the installation and configuration went fine or not:Java Installation and Configuration

So I have checked java version with command prompt, if there is anything wrong with configuration or installation this command will not get successfully executed and there will be error message. So this is a small way to check installation of java.

JRE is basically shorthand for Java Runtime Environment. It is basically the Java Virtual Machine where your Java programs run on. It also includes browser plugins for Applet execution.

JDK is shorthand used for Java Development Kit, which is the Software Development Kit for Java, including JRE, and the compilers and tools (like JavaDoc, and Java Debugger) to create and compile programs.

Usually, when you only care about running Java programs on your browser or computer you will only install JRE. It’s all you need. On the other hand, if you are planning to do some Java programming, you will also need JDK.

JVM (Java Virtual Machine) is an abstract machine. It is a specification that provides runtime environment in which java bytecode can be executed.

Back to top

What is polymorphism, Explain inheritance in java? Also explain overloading and overriding in java.

Polymorphism in object oriented programming is a concept where in an object can take one or more forms. Its like one name many forms. Any java object is elibigle to called polymorphic when an object “IS-A” kind of object. For example we have a parent class, then the eligible child classes can be Audi, BMW etc. So these child classes will extend the parent class that is Car and at the same time we can say Audi “IS-A” car, which makes Audi or BMW object polymorphic.

Lets understand the same with an example.

Here we will be creating a Car interface and this interface will have some methods that will be common to call cars.

package com.javatutorial.polymorphism;

public interface ICar
{
    
    void setEngineCapacity(String engineCapacity);
    
    String getEngineCapacity();
    
}

So we have created a simple interface that is called Icar. This interface has two dummy methods that will setEngineCapacity and getEngineCapacity.

Now lets create impl classes for this.

First let say we create AudiImpl class that will for car audi.

public class AudiImpl implements ICar
{
    @Override 
    public void setEngineCapacity(String engineCapacity)
    {
        //
    }

    @Override 
    public String getEngineCapacity()
    {
        return null;
    }
}

Now lets create BMWImpl class with our ICar interface implementation.

package com.javatutorial.polymorphism;

public class BMWImpl implements ICar
{
    @Override 
    public void setEngineType(String engineType)
    {
        //
    }

    @Override public String getEngineType()
    {
        return null;
    }
}

Lets create a Main class and try to understand the IS-A concept that is behind Polymorphism.

package com.javatutorial.polymorphism;

public class Main
{
    public static void main(String[] args)
    {
        ICar carAudi = new AudiImpl();
        ICar carBMW = new BMWImpl();
        
        getCarEngine(carAudi);
    }
    
    private static String getCarEngine(ICar car){
        return car.getEngineType();
    }
}

So first thing to notice is that when the objects are polymorphic in nature we can create the objects with Interface reference. Now both AudiImpl and BMWImpl implements the ICar interface, so we can say that these two objects “IS-A” ICar type.

Next thing comes DynamicBinding,  which is the calling code even doesnot know on what type object the call is made. See getCarEngine method, here we are just passing objects from our main method but we are receiving the object in ICar interface and we made call to our actual object. This is beauty of polymorphism.

Now lets talk in brief about overloading and overriding.

We call Overloading, when two or more methods in one class have the same method name but different parameters.

We call Overriding, when two methods with the same method name and parameters. But Import point to note is one of the methods will be present in the parent class and the other is in the child class. Overriding allows a child class to provide a specific implementation of a method that is already provided its parent class.

Back to top

What are different types of class loaders in java, explain class loading in java?

There are three kinds of class loaders in java :

  • Bootstrap (primordial)
  • Extensions
  • System

BootStrap or Primordial class loaders are class loaders that Loads JDK internal classes, java.* packages. Which will be defined in the sun.boot.class.path system property, typically loads rt.jar and i18n.jar.

Extensions class loaders are class loaders that Loads jar files from JDK extensions directory. Which will be defined in the java.ext.dirs system property – usually lib/ext directory of the JRE.


System class loaders are class loaders that Loads classes from system classpath Which will be defined in the java.class.path property, which is set by the CLASSPATH environment variable or –classpath  command line options.System Class Loader

Class loaders are hierarchical, and maintain visibility. Bootstrap class loader have no visibility on the class loaded by Extension class loader and Extension class loader have no visibility over the classes loaded by classpath loader or System class loader.

Class loaders use a delegation model when loading a class. They request their parent to load the class first before they attempt to load it by their own. When a class loader loads a class, the child class loaders in the hierarchy will never load the class again, here classloaders maintain uniqueness.

Classes loaded by a child class loader have visibility over the classes loaded by its parents but not vice versa.

Back to top

What is difference between Composition and Aggregation?

Composition and Aggregation are concepts where two objects use each other’s functionality. When one object use functionality or services exposed by other object it is called Association.

Composition is when one object or one class associated with other class or object in such a way that the class can not have any meaning if other class is not present. Lets take an example of Bike, a Bike  have many objects like Tyres, Engine, Gear and so on, but when the bike is destroyed all these objects will also destroyed. These objects can not function if there is no car object. This concept is called Composition in java.

Aggregation is when two or more objects are associated with each other in such a way that if any of the object dies or destroyed, other one will still exist. Lets take an example, A Company can have many employees, when a scenario where Company is closed, Employee can join other company as well.

We can say composition is stronger than Aggregation.  A relationship between two objects is known as  an association, and an association when one object owns other is known as composition, while when an association one object uses another object is known as aggregation.Composition Vs Aggregation

So as we can see, Composition represents the strongest form of relation between objects where as Aggregation denotes a slightly weaker relationship between objects then composition, Association is most general form of relationship.

Lets take a practical example of Composition. Here we will create a Class name Bike, and other class as Tyre, that will have brand variable in it. Lets create this:

package com.javatutorial.polymorphism;

public class Bike
{
    private final Tyre type;

    public Bike(){
        type  = new Tyre("MRF");
    }

}

class Tyre {
    
    private String brand;

    public Tyre(String brand){
        setBrand(brand);
    }
    
    public void setBrand(String brand){
        this.brand = brand;
    }
    
    public String getBrand(){
        return brand;
    }
}

So as you can see Bike class constructor is initializing Tyre class, so the lifetime of class Tyre associated with Bike object, and whenever Bike class will destroyed the Tyre class will also destroyed. These both objects have strong relationship with each other and this is what we call Composition.

Lets take example of aggregation, here we will have a class Company and the company will have list of Departments. Now the difference with this is, Company class is not responsible for initializing the department class, and when the Company class will be destroyed the same Department class will not get destroyed, since both have their own life cycle. This is what we call Aggregation.

import java.util.ArrayList;
import java.util.List;
public class Company
{
    List<Department> departmentList = new ArrayList<>();
}

class Department{
    String deptName;

    //getters and setters
}

Back to top

Continue with More Java Interview Questions and Answers:

What is difference between Abstract class and Interface in Java, also explain when to use what?

In OOPS there is a principle called Abstraction, that is to abstract things from outer world. To achieve this interface and abstract classes are used.  Abstract classes are the classes in java that can have methods in such a way that some can have implementation and some will not have. These unimplemented methods are called abstract methods and we use abstract keyword to declare such methods. Now thing is we can not instantiate the abstract class. One more thing with abstract class is that there must be one method that will be abstract in this class to be called as abstract, if there is no abstract then we can not write class as abstract, the compiler will complain. Same if there is any abstract method in there and we declare the class as normal class then also compiler will complain and force us to declare class as abstract. These classes are meant to written for inheritance.

On the other hand interfaces are also abstract classes but these are pure abstract classes. Like we talked about the declaration and definition of methods in abstract  class like some can have some  may not have implementation, but in interfaces methods that we write are 100% abstract, mean there will only be declaration and the class that is implementing the interface, that class will have to provide the implementation. Methods declared in interfaces are by default abstract. We write these both to achieve abstraction. Like let say I have a service, whose job is to insert some data in database after some processing, so I will only provide the service interface to outer world with some methods. The actual processing will be done in the implementing class of this interface and the implementation I will hide from outer world. This is beauty of abstraction.

Lets take example of how we write abstract class and interface.

Lets create an interface named IVehicle that will have some methods in it:

public interface IVehicle
{

    String getBrand();

    String getModel();

    String getEngineCapacity();

    String getFuelType();

}

So what we have done is we have created an interface named IVehicle with some methods in it, so every class that will implement this will have to provide implementation of these methods.

Now there are some methods, in which Brand, Model, EngineCapacity and FuelType will be provided. So now we will create one more level of abstraction and we will segregate the classes with one that have fuel type as diesel and one with fuel type as petrol. Why we will do this because all petrol cars object will not have to implement these methods. So we will create two abstract classes, lets create them:

public abstract class AbstractDieselVehicle implements IVehicle
{
    @Override
    public String getFuelType()
    {
        return "Diesel";
    }
}

public abstract class AbstractPetrolVehicle implements IVehicle
{
    @Override
    public String getFuelType()
    {
        return "Petrol";
    }
}

So now we have created a hierarchy and added one level of abstraction. Every petrol type vehicle will have to extend the AbstractPetrolVehicle and every diesel type of vehicle will have to extend the AbstractDieselVehicle abstract class and the class have to provide the implementation for rest of the methods. Below is the example for AudiA3 class that extends AbstractPetrolVehicle and this class has to provide the methods implementation.

Back to top

Explain serialization in java, what is use of Serial Version UID?

Serialization is the process wherein object is converted into bytestream and it’s state is saved, so that the object can be travel over the network. In order to achieve serialization java provides Serializable interface, that is marker interface. So any object on which we need to achieve serialization, the class must extend Serializable interface.

The process from which the byte stream converted to java object again is known as deserialization. In this the persisted file or the serialized byte stream is converted in java object.

public interface Serializable {
}

As we talked about the Serializable interface, the above pasted code is the code for this interface, as you can see there are no methods in this interface that’s why these type of interfaces are known as marker interface. They just let the jvm know that what type of object it is, rest JVM takes care of.

There can be a scenario wherein we don’t want to serialize all the fields of a class, and we want some fields should not get serialized, to achieve java provides one more keyword that is transient. All fields maked as transient will not be part of the serialization process.

Since serialization is the process where object’s state is persisted, so obviously the question comes in our mind, what about the static things. Since static variables are directly belong to a class and they don’t have anything to do with object. So the answer is that the static variables are not part of serialization  process as well, since first thing they belong to a class and not with an object and second is they are not part of object state.

SerialVersionUId , whenever we are going to serialize and our class implement serializable interface the IDE says something like this,

The serializable class doesn’t declare a static final serialVersionId of type Long.

So why it is always encouraged to use SerialVersionUID, basically this id is something unique that represents the object and whenever the object is being deserialized this id is being matched and if the id doesnot matches jvm throws InvalidClassException. This id is being placed just to ensure that the object is the same that it was at the time of serialization.

If one doesnot provide the serialVersionUId then the JVM automatically calculate the serialVersionUid and provide one. The same is calculated as the hashcode of the class and the membervariables and so.

One more question arises to our mind is that just above we talked about that the static variables are not part of serialization process since they doesnot belongs to the object state. And now we are talking about that the serialversionUid is used at the time of deserialization, meaning that the serialVersionUID is part of object byte array that is crated at the time of serialization. Its contradictory isn’t it ? Yes !! So what happens is that whenever the object is converted into the sequence of bytes at the time of serialization, then the serialVersionUid is added to the class metadata. And the same is travelled to the network so that whenever the deserialization process happenes the jvm quickly pickup the serialVesrionUID and matches it.

Lets take an example of the same:

First we will create a class name Car which is going to be serialize.

class Car implements Serializable{

    private static final long serialVersionUID = 3L;

    private String model;

    private String make;

    public String getModel()
    {
        return model;
    }

    public void setModel(String model)
    {
        this.model = model;
    }

    public String getMake()
    {
        return make;
    }

    public void setMake(String make)
    {
        this.make = make;
    }

    @Override public String toString()
    {
        return "Car{" +
                "model='" + model + '\'' +
                ", make='" + make + '\'' +
                '}';
    }
}

Lets serialize and deserialize, and check if we got the same object or not.

package com.javatutorial.serialization;

import java.io.*;

public class MainSerialization
{

    public static void main(String[] args) throws IOException, ClassNotFoundException
    {
        Car car = new Car();
        car.setMake("2016");
        car.setModel("Audi-A3");

        //Serialize
        ObjectOutputStream oos = new ObjectOutputStream(new FileOutputStream("test.ser"));
        oos.writeObject(car);

        //Deserialize
        ObjectInputStream ois = new ObjectInputStream(new FileInputStream("test.ser"));
        Car objCar = (Car) ois.readObject();
        System.out.println("Car object : " + objCar);
    }

}

Lets run the code and see if got the same object that we serialize, with make as 2016 and model as Audi-A3.

Upon running the code what we got id:Serialization in Java

So we got the same object that we serialized. This was the code running example of serialization concept.

Back to top
This Java Tutorial Series is continued and you can find more Java Interview Questions in next Web Development Tutorial here.Courses Online

Top Technical Interview Questions and Answers Series:

The post MUST Have Core Java Interview Questions appeared first on Web Development Tutorial.

Top 20 MongoDB Interview Questions

0
0

In order to build a MEAN-based web application, MongoDB plays the key role along with AngularJS, NodeJS and Express. In this MongoDB Tutorial, our focus is to start learning MongoDB from beginning. This article can also be taken as Part-1 in Series of MongoDB Interview Questions with practical and detailed answers. We will start will very basic questions about MongoDB including What it is? How to create a NoSql database using MongoDB and then moving to more advanced topics.MongoDB Interview Questions

Getting Started MEAN Stack Tutorial Series

We already have covered other components of Full Stack JavaScript by cover the followings:


MongoDB Interview Questions Tutorial – From Beginner to Professional

What is MongoDB, explain MongoDB as Nosql database in detail and how it is different from relational database?

MongoDB is cross platform document based database. It is a NoSql database and very different from traditional relational databases like Oracle, MS SQL, MySQL etc. MongoDB provides high availability, high performance and easy scalability. Easy scalability means it is very easy to scale MongoDB database in comparison of relational databases.

MongoDb works on the concept of document and collections. We will go through each and dig down in detail. Lets first quickly understand what NoSql databases is?

What is NoSql database?

NoSql referred as non-sql databases that enables us to store and retrieve data in non-tabular format. When we say non-tabular format then we want to say there will no tabular database like relational database. So the data will be present in non-tabular formats.

Now lets understand what document and collection is, with respect to MongoDB, which are backbone of this database.

Document:

Document in MongoDb is a set of key value pairs. Each document has schema associated with it. These schema are dynamic in nature. MongoDb stores documents as BSON data, that stands for Binary representation of JSON data. BSON is binary serialization format that is used to store JSON data. As we discussed above MongoDb documents are key-value pair set and have the following structure.

{
    Key1: value1,
    Key2: value2,
    Key3: value3,
    Key4: value4,
    Key5: value5
    ...
    ...
    keyN: valueN
}

Value can be any of the datatype that BSON supports. BSON supports number of datatypes.

Collection:

In MongoDb collections are used to store documents. Collections can be taken as tables in relational databases.

If we compare MongoDb with relational databases, then Table of relational database is called Collection in MongoDb, Row of relational database is document in MongoDb, Column is called field here and joins are referred as embedded documents.

Below is the simple example of a document:

{
    _id: ObjectId(76dede33htfeed4)
    employeId: 299377,
    employeName: "Jerry",
    address: "Street3, NY",
    technologyKnown: ['java', 'python'],
    salary: 108770,
    education: [
        {
            degree:"MCA", 
            dateCompleted: new Date(2009,2,10,1,11)
        },
        {
            degree:"BSC", 
            dateCompleted: new Date(2006,2,10,1,11)
        }
    ]
}

In the example above we have created a simple document, that contains information about a employee.

_id is the identity of document, it is basically a hexadecimal value, that ensures uniqueness of a document. As we can see employeeId is type of int, address is String, technlogyKnown is array of Strings. In the education field, there is date field. There are verify of datatype that MongoDb supports.

Although there are few restrictions with key or field names:

  • Field names cannot be null.
  • Field names cannot contain dot (.)
  • Field names cannot start with dollar sign($).

_id is reserved for primary key in MongoDb.

Back to top

What are key advantages of MongoDB?

Key Advantages of MongoDB:

Following are  the  key advantages of using MongoDB i.e. a NoSQL database:

  • Removal of Complex Joins:
    unlike relational databases where tables are referentially connected, and to retrieve data, we need to build a complex query using joins. To write such complex queries one need to have a very good command on db. In MongoDb you need not to write such complex queries, all you need to do is to design a good schema that will contain these documents
  • Easy to scale:
    MongoDb enables us to horizontal scale the database. For this purpose there is technique called sharding is used.
  • Clear structure of object:
    In MongoDb if there is good schema defined, there will be a very clear structure of object and one can easily identity the collection and document structure.
  • Failover:
    Failover is automatically handled, that means , in a cluster if a node goes down which is primary, secondary node automatically comes up.

Back to top

Learn the #1 Resource to Become a MEAN Stack Developer

Plus, Quick and Easy way to develop your First Angular 2/ Angular 4 Real-world Application with a NodeJS Backend.
  • Learn MEAN Stack Development
  • How AngularJS interacts with BackEnd
  • Use MongoDB with Mongoose
  • Using ExpressJS as NodeJS Framework
  • Front End Optimistic updation

Learn More Now…Click Here

Explain with steps how to configure MongoDB in details, attach code snippet and diagram whereever applicable?

To configure MongoDb on our local machine or on some remote machine, first we need to download the extract of MongoDb from MongoDb official website (https://www.mongodb.com/download-center).

Based on the operations system, we need to download the extract or installation file. Make sure you are downloading the latest version of MongoDb.

One you have downloaded the extract from web. Now we need to install and configure it. Here we will be talking about installation and configuration on Windows operating system. First we need to install the extract file that is downloaded from MongoDb official site.

First we need to create two folders data and under data we need to create db folder. Following will be commands for the same.

Here I am creating these two folders in C drive.MongoDB Tutorial

Once we have created these two directories, we need to navigate to bin folder of mongodb insallation directory. After that we need to run the command as below :

mongod.exe –dbpath “C:\data\db”

MongoDB Installation TutorialIf every things goes fine then, console will show waiting for connections, which indicates that mongodb has been installed and configured successfully.MongoDB Configuration

Now to run MongoDb, open console in other console. And run mongo.exe command.MongoDB Commands

In the snap above, we have connected to mongodb and created a test record and executed a find command which ensures that mongodb has been installed and executed successfully. These find and save commands will be covered in next questions.

Back to top

Explain how to define schema in MongoDB with example, how these schemas are different with RDBMS schema, explain with example?

Data in MongoDb is stored in form of key , value pairs. And a set of these data is called document in terms of MongoDb. Each document has a flexible schema. Documents don’t need to have the same set of fields, structure. MongoDb provides such flexibility.

While designing mongodb schema , there are few things that we need to keep in mind.

  • Objects that are intended to use together, should be kept in a document. If not then its better to separate these objects in different documents.
  • Schema should be optimized for the queries or use cases that are most frequently used.
  • Joins can be used but make sure to use joins while writing data on data base not while reading data from database.
  • Schema should be designed particularly on the requirement and should be flexible.

Lets try to understand it with an example and we will compare the schema of MongoDb with RDBMS schema.

Lets suppose we are designing a online shopping web application. Which have the following requirements:

  • There will be multiple items with some tags.
  • Each item will have unique name and description.
  • Each item will have information about seller, name and id.
  • Each item will have then number of comments given by users with likes and dislikes
  • On each item can have multiple comments or no comments.

Lets see how RDBMS schema will look like:MongoDB Schema Example

As we can see, as per our requirement, there will three tables, which will have relation to each other. There will be an item table with some fields, which will have connected with tags table. Tags table will have referential relation with item table, Same goes for comments table, which will also have referential relation with item table.

Now lets try to achieve the same with MongoDb. Lets design schema for the same in MongoDb. MongoDb schema will have a well defined collection, which will adhere to the requirement. Below is the schema for the same.MongoDB Schema Tutorial

Now if we compare both the schemas, we can see in relational database we need to create three different tables with referential relation, where as in MongoDb the same can be achieved by just a well defined collection.

Back to top

Explain how to create database in MongoDB?

To create database in MongoDb, ‘use’ command is used. This command is used to create database in MongoDb. It will create database if doesnot exists if exists it will return the existing database name. In MongoDb the default database is ‘test’. If we don’t create any database the collections will be stored in the default test database.

Syntax of this command is as follows:

use <DATABASE_NAME>

Lets try to understand this command with example :

Suppose we need to create database with name BookStore. Syntax for the same will be:Create MongoDB DatabaseLets say we want to check the list of database, we will use the show dbs command. Below is the syntax for the same.MongoDB Database Tutorial

Wondering ! why our newly created database is not in the list. The answer is the database should have at least one document stored. Once our db will have records or documents, it will be displayed in the list.

Lets create a record in db and try to check the same with show dbs command.Show DBS Command

Here we have created a document and stored a record in this. Now if we check with the same command , as you can see our newly created database BookStoreDb is top on the list.

If you want to  check on which database you are currently on, db command will be used, below is the syntex:BookStoreDB in MongoDB

Back to top

What are collections in MongoDB, explain with example?

Collections in MongoDb:

Collections in MongoDb are similar to tables in relational databases. Collections contains the documents in MongoDB. These documents may or may not be in the same structure.

To create collections in MongoDb createCollection is used. Syntex to create collection in MongoDb is :

db.createCollection(name, options)

This method takes two parameters, name and options. Name is implicit that is name of collection that is being created. Options is the optional parameter and of document type. Which will have configuration related to document.

Below are the configuration options for collection:

  • autoIndexID, which is Boolean type of field, optional parameter, true means index should be creted on the _id. Default value is false.
  • max , number type of field, optional parameter, indicates max number of documents allowed in the collection.
  • capped , Boolean type of field, optional parameter, if true creates a capped collection.
  • size , number type of field, indicates the size of capped collection.

Lets try to understand with creating a collection:Creating Collections in MongoDB

Here we have created a collection with ComputerProgramming name.

Now lets check the created collection. To list the collections in MongoDb, the following command will be used:

show collections

Lets try it:Show Collections

As we can see it has the list of collections and our newly created collection(ComputerProgramming) as well.

Now lets create collection with the optional fields:MongoDB Collections Tutorial

As we can see, MongoDb has created collection with the options provided. Lets try to list collections now, it should both the collections that we have created.MongoDB Collections List

In MongoDb, we don’t need to explicitly create collections. MongoDb automatically creates the collections once we insert document. Lets try to create  a collection not with createCollection command, but directly inserting records.Show Collections in MongoDB

As you can see now, we have directly inserted document in ScienceBooks collection, which was not present. MongoDb automatically created ScienceBooks document and inserted records in it. In show collection command now it has the collection, ScienceBooks. It is all about collection and database in MongoDb.

Back to top

Learn Professional Web Development in AngularJS while building 10 unique Web Apps.
77 lectures, 14.5 Hours Video, All Levels
  • Your First Angular Website
  • Web Template Store
  • myContacts App
  • ngSocial Facebook App
  • Job Directory
  • KnowledgeBase
  • User Authentication App
  • Instagram Gallery
  • PubNub Chat
  • AutoFind

And also we will find Quiz at the end of each application to verify the skill improvement.

Intermediate to Advanced MongoDB Interview Questions Tutorial

How to create backup and restore the MongoDB database? Explain with example?

Backup is basically to create a dump of existing database, that can be restored as and when required. As in relational database, MongoDB also provides the functionality to create dump of database and use it dump when required, with restoring functionality.

Creating Backup with MongoDB:

In order to create backup of existing database in MongoDB, MongoDB provides mongodump command. Using this command we can create dump of database. This command will create the entire dump of your database in the dump directory.

mongodump

There are few options available with this command, that can be used as needed. Following are the options available with this command:

mongodump  --host <host-name> --port <portnumber>
This command will create the db dump on the given mongodb instance.
For Example:
mongodump –host bookstore.com –port 34889

mongodump --dbpath <path_of_db_that_needs_to_be_backedup> --out <output_directory_for_backup>
This command will create db dump of specified database on the specified output directory.
For Example:
mongodump --dbpath /data/db/ --out ../backup/

mongodump --collection <collection_name> --db <database_name>
This command will create dump of specified collection of specified database.
For Example:
Mongodump --collection OrganicChemistry --db ScienceBooks

Now lets create a backup of db. For this we need to traverse to bin directory of Mongodb installation. Once we are on the bin directory on command prompt, run ‘mongodump’ command. This command will create a dump directory in bin directory of MongoDB. And it will keep all the backup in this folder. Lets try to run the command:MongoDB Tutorial Taking Dump

As we can see, it has created dump of our database successfully. Let’s traverse through the folder structure and try to see dump folder contents:MongoDB Dump Folder Structure

So this will be the folder structure of dump folder. It has created the dump and as we have created BookStoreDB, we can see the dump of that db as well.

Restore Backup with MongoDB:

Similarly to restore the backup, MongoDb comes up the mongorestore command, this command will restore the backup created.

mongorestore

To run this command we need to traverse to bin directory from command prompt and once we are on bin directory, we need to run this command. Lets try to run this command and see:MongoDB Restore Tutorial

As we can see, our created backup has been restored with this command.

This is all about backup and restore database in MongoDb.

Back to top

What are CRUD operations and how these crud operations are performed in MongoDB? Implment a proper example with PHP to connect with MongoDB and perform all CRUD Operations.

CRUD operations in database terms stands for Create, Retrieved, Update, Delete. All databases irrespective of Sql or Non sql have these functions in place. We will go through one by one with example in MongoDB and PHP.

MongoDB and PHP Example:

Like relational database connection, first we need driver to connect. For this we need to download driver from official site. Once we are done with download of driver, we need to put the dll file that is php_mongo.dll in ext directory. After adding the file to ext directory in php.ini file we need to add a line that will have a reference to this dll file.

extension = php_mongo.dll

Once we are done with this, we are set to go with our php code that will create database connection and perform these operations. Lets start with connecting to db and creating a collection:

<?php
   $connection = new MongoClient();
   $database = $connection->BookStore;
   $collection = $db->createCollection("ScienceBooks");
   echo "Collection ScienceBooks created succsessfully, on BookStore database";
?>

The code above will create connection to MongoDb database instance. It will take the database which is BookStore in our case. Once we have selected BookStore database, we are good to go with creating a collection. createCollection() function will create a collection in our case we are taking collection as ScienceBooks. If everything goes fine, we will able to see the below on console.MongoDB and PHP Tutorial

Once our collection is created, we are good to go with performing CRUD operations.

Lets start with C, that is create a record. To create a record, insert() method is used in MongoDb, that takes document as argument, which contains the data that needs to be inserted.

Lets suppose in our bookstore, we need to create records for ScienceBooks, that will have BookName, BookAuthor, ISBN fields. Now are already created collection for ScienceBooks, all we need to do is to create a records underneath it. Below is the example to achieve the same.

<?php
   $connection = new MongoClient();
   $database = $connection->BookStore;
   $collection = $db->ScienceBooks;

   $record = array(
      "BookName" => "Organic Chemistry",
      "BookAuthor" => "James",
      "ISBN" => "45387644"
   );

   $collection->insert($record);

   echo "Created a record in BookStore Db.";

?>

Lets try to understand the above code, we have already created a collection. Now we need to create a record underneath it, what we have done is we have created a record with the fields, for example purpose and make code readable I have hardcoded the values, which will never be in real world scenario, values will be dynamic and not static. We can add as many records in the array as we want. Once our array is ready with the records, all we need to do is to pass it to insert method. If everything goes fine, the below message will be displayed on our console.CRUD Operations with MongoDB

Now lets come to R, that is for read operations in CRUD. Lets try to find out the record that we have just created. To read or in other words to find document in MongoDb term, find() method is used. Lets simulate from code and try to retrieve record from BookStore database.

<?php
   $connection = new MongoClient();
   $database = $connection->BookStore;
   $collection = $db->ScienceBooks;

   $records = $collection->find();

   foreach ($records as $record) {
      echo "BookAuthor :: " . $record[“BookAuthor"] . "\n";
   }
?>

In the above code fragment what we have done is, we have fetched records from ScienceBooks collection, and print BookAuthor. So basically find method will return me list of all records, once I get list of records, we need to traverse through is to get records and print the required value from key associated with it. Like in the code above we have printed book author, which was stored with BookAuthor key.

In crud operations, U stands for updating records in the database. In MongoDb, updations on a record is done though update() method. Just now we have created a records in BookStore database and in ScienceBooks collection. Now we need to updated it through and lets suppose we need to update ISBN number which was by mistake entered incorrect. Below is the code for the same:

<?php
   $connection = new MongoClient();
   $database = $connection->BookStore;
   $collection = $db->ScienceBooks;

   $collection->update(array("ISBN"=>"45387644"),
      array('$set'=>array("ISBN"=>"45387984")));

   $records = $collection->find();

   foreach ($records as $record) {
      echo "ISBN :: " . $record[ISBN"] . "\n";
   }

?>

In the example above, we have just updated the ISBN number that was stored incorrect, we have updated to correct one and finally printed the updated entry. After successful run of the above code fragment we will get ISBN number as 45387984.

Finally lets come to D, that is delete operation in CRUD. To delete a record or in MongoDb terms, to delete a document from database, remove() method is used. Lets try to remove the document with ISBN key as 45387984, which we have just updated:

<?php
   $connection = new MongoClient();
   $database = $connection->BookStore;
   $collection = $db->ScienceBooks;

   $collection->remove(array("ISBN"=>"45387984"));

?>

In the code fragment above we have deleted a record with ISBN key as 45387984. Now if we add the fetch code here and try to traverse over it, it will print nothing. Since the document is no more in the database.

Back to top

What are indexes with respect to a database, how indexing is performed in MongoDB, explain with example?

Indexes are basically a special kind of data structure in database term, which helps to optimize the query performance. Basically while searching in MongoDB , in a normal search, let suppose you have millions of documents in a collection, then for a particular document search, MongoDB have to search through each and every document in the collection which is time taking. While having indexes in place, MongoDB will limit the search with help of these indexes.

In principle Indexes stores the value of a specific field or a set of fields ordered by the value of the field. Since the data is partial, it becomes easier to read this data.

Creating Indexes in MongoDb:

To create index in MongoDb, createIndex method is used. Below is the syntax to create index in MongoDB.

db.<collection_name>.createIndex(<key>:<ascending parameter>)

Collection name will the name of collection. Key will the key on which index needs to be created, next parameter indicates that the key on which index to be created, it’s values should be in ascending or descending order. 1 indicates that values will be in ascending order, whereas -1 indicates that values will be descending order.

Lets take an example, Suppose we have a BookStore database which have collection as ScienceBooks. Document in this collection looks as:

{
	BookName : <Some Book Name>
	BookAuthor: <Some Book Author>
	ISBN: <ISBN>
}

Lets assume we need to create index on BookName field. Below will be code for the same:

db.BookStore.createIndex({BookName:1});

The above code will create a index on BookName field and the values will be in sorted in ascending order.

Indexes can be created on more than one fields, that mean, if we want to add other keys in index, we can and the index will be created on both key fields. Lets try to run the command and create the index:MongoDB Indexes Tutorial

Lets try to understand the output now :

  • numIndexesBefore indicates that how many indexes are present before this command is executed.
  • numIndexesAfter indicates that how many indexes are present after this command is executed.
  • ok represents that the operation was successful and indexes are successfully created in database.

Lets say we want to know how many indexes are there in databases and on what keys they are, getIndexes() command is used. Below is the syntax for the same:

db.<collection_name>.getIndexes()

Lets try to run the command and try to get the list of indexes present in our ScienceBooks collection:MongoDB Indexes Interview Questions

As we can see there are two indexes displayed in the output, one is on _id field and other is on OrganicChemistry field. ‘1’ , as we have discussed, indicates that field values are sorted in ascending order.

Now lets suppose, I want to delete an index from my database. There are basically two methods for dropping indexes from MongoDb. One is to delete an individual index and other is delete all indexes from database.

To drop a particular index, dropIndex() method is used, which takes key as parameter. Below is the syntax for the same:

db.<collection_name>.dropIndex({<Key_Name>:<Order>})

Drop Indexes from MongoDB:

To drop all indexes from database, dropIndexes() method is used. That will drop all the indexes present on collection.

Lets try to run and delete the index that we just created on OrganicChemistry key field:Drop Indexes MongoDB

In output we got nIndexesWas , which indicates that how many indexes were present before execution of this command, where as ok, indicates that the command run was successful.

This is all about creating. Finding and dropping indexes from database.

Back to top

What is projection with respect to MongoDB, how sorting is performed in MongoDB, explain with example?

Whenever we try to find some data from MongoDb, find() method is being used. This method will return me the documents of collection on which this is invoked. Now I can have the where clause as well in my MongoDb query so I can limit the output. Consider a scenerio where I want to retrieve particular fields of document, how to do so?

Lets dig more into it, for an example let say in our bookstore database, from ScienceBooks collection I want to find books with Author James. Whenever I will execute the find method MongoDb will return me the all the documents in the ScienceBooks collection in which Author is James. Now lets suppose I just want ISBN number of the books whose author is James. In order to achieve this there is a concept in MongoDb that is used and called Projection. Below is the syntax for the same:

db.<collection_name>.find({},{<Key_Name>:<Flag to display>})

In the command above, KeyName will be key whose corresponding fields we need to display. Flag to display takes 1 or 0 as input. 1 indicates that the corrospoinding values will be displayed where as 0 indicates that the corresponding values will not been displayed.

Lets try to simulate the same with example:MongoDB Projection TutorialAs we can see, the output of find command displayed all records of ScienceBooks collection. Now I want to have projection in place and want to see only name and not _id. Lets see how we can achieve this:MongoDB Projection Interview Questions

As we can see in the output, only name is in the output and not _id. And why it is, because if you see the find method, we have used display parameter ‘1’ with name and ‘0’ with _id.

This way we can use projection in our code to find the results which we want.

Back to top

This mini NodeJS course will help you learn how to design your own eCommerce website using NodeJS, Express and Kraken. NodeJS is a brilliant open-source JavaScript runtime environment that allows developers to create powerful and dynamic server-side web applications.

In this project-based course, you will build an entire Bookstore from scratch. You will be able to add, edit and delete books to the backend and customers will be able to browse, add and delete books from their cart as well as purchase it using Paypal.

NodeJS Course
Take this Course Online Now

So far, we have covered beginners to intermediate level MongoDB Interview Questions in this Series. Next part in this series contains more advanced MongoDB FAQs/Interview Questions with detailed examples and source code. Keep in touch 🙂

Top Technical Interview Questions and Answers Series:

The post Top 20 MongoDB Interview Questions appeared first on Web Development Tutorial.

Advanced MongoDB Interview Questions

0
0

This MongoDB Tutorial is Part 2 in series of MongoDB Interview Questions. In this technical interview questions part, we will learn about more advanced topics related to MongoDB as NoSQL database. If you haven’t gone through the previous part, we will highly recommend to go through the previous one first and then move to these advanced Interview questions or topics on MongoDB. MongoDB Interview Questions

Getting Started MEAN Stack Tutorial Series

We already have covered other components of Full Stack JavaScript by cover the followings:

MongoDB Tutorial PDF version will be available later for download.


MongoDB Interview Questions Tutorial – From Beginner to Professional

What is difference between Replication and Sharding? Can we achieve these two with MongoDB?

Replication:

Replication as the name suggests, is the process of synchronizing data on multiple servers. In other words the copy of data will be maintained on different servers. Replication gives us the surety that the data is available on more then one server. This increases the availability of data, since data will be available on more then one server. It helps us to fight against data loss since in case of fail-over of server data will be available on other servers.

With replication in place there will be no data loss, also the availability of data will be 24/7, we don’t need to worry about downtime since there are replicas and we can use any of the server to read. Data will be read scalable, that means since there are more than more copies of same data, app can use any server instance to read.

Replication with MongoDB:

In mongodb replication is achived by replica sets. A replica set is a group of mongodb instances that have the same data. In replica set one node is primary node that receives  all data and primary node then replicates the data to secondary nodes. There can be only one primary node in replica set.

A replica set is a group of two or more nodes, within which there will be one primary node and other nodes will be secondary nodes. Data is typically replicated from primary node to secondary nodes. At the time of failover a new primary node is automatically selected and connection is established to the new primary node.Replication in MongoDB

The above diagram demonstrates how replication is performed in MongoDB.

Lets see how replica sets are created?, below is the syntax for the same:

mongod.exe  --dbpath “c:\data\db” –replset “instance_name”

We need to shutdown the mongodb instance first and then again execute this command with the replica set name. –replset is the command flag that is need to start mongodb with replicaset.

Once server is started, from mongodb client we need to fire a command that is rs.intiate() to initiate a new replicaset.

Sharding:

Sharding is the concept of splitting data across multiple machines. It basically splites data among smaller datasets and stores across machines. At times querying against huge data set needs a very high cpu utilization. To tackle this situation Mongodb comes up to a concept of sharding, which actually splits the data across multiple machines. This can be a large collection of shards but logically all shards works a collection.

Components:

Components of a shard typically include the following:

  • Shard: Shard is a mongodb instance which holds the subset of data.
  • Config server: Config server is also a mongodb instance which holds information about the mongodb instances which holds shared data.
  • Router: Again a mongodb instance which is responsible for directing the commands sent by server.

This is all about Replication and Sharding in MongoDB.

Back to top

In RDBMS there are functions available for min, max, count etc. for aggregation, are there any such functions available in MongoDB to achieve aggregation, explain each aggregation function with example?

Aggregation is the concept of processing data records and return aggregated result. Like RDBMS aggregation is possible as well in MongoDb as well. Ofcoures here we will not be using select count(*) type of syntaxes but the same will be achieved by functions available in MongoDb. Aggregation group multiple records/documents from a collection and perform operation on these records and return a computed result. In MongoDb aggregate()  method is used to perform aggregation. Below is the syntax for the same:

db.<collection_name>.aggregate(<aggregate_function>)

Lets add some records in the collection ScienceBooks, with following schema:

{
	BookName : <BookName>
	Category : <Book_Category>
	Price : <Book Price>
}

To demonstrate this, we have created a records file with some data and imported to database. Below is the content of the file:

{"BookName" : "HeadFirstJava", "Category" : "ComputerScience", "Price": "100" }
{"BookName" : "HeadFirstDesignPattern", "Category" : "ComputerScience", "Price": "130" }
{"BookName" : "SpringInAction", "Category" : "ComputerScience", "Price": "400" }
{"BookName" : "OrganicChemistry", "Category" : "Chemistry", "Price": "110" }
{"BookName" : "PhysicalChemistry", "Category" : "Chemistry", "Price": "190" }
{"BookName" : "InorganicChemistry", "Category" : "Chemistry", "Price": "70" }

Lets import this file now and see the output:Sharding in MongoDB

The code above demonstrates the import and find from books collection:

Count():

Now our books collection which is in BookStoreDB has few records , with which we can play around through aggregation :

Lets suppose we want to find how many books are in Chemistry Category and how many in ComputerScience category, similar to select Category, count(*) from books group by Category;Aggregation Function in MongoDB

min() :

Now lets suppose we want to get the minimum price for each category, below is the code for the same:

db.books.aggregate(
        [
                {$group : 
                    {
                        _id : "$Category", min_price : {$min : "$Price"}
                    }
                }
        ]
);

Executing this code will result in the minimum price of book for both the categories.

max():

Similiarly suppose we want to get the maximum price for each category, below is the code for the same:

db.books.aggregate(
        [
                {$group : 
                    {
                        _id : "$Category", min_price : {$max : "$Price"}
                    }
                }
        ]
);

Executing this code will result in the maximum price of book for both the categories.

sum():

Now if we want to have the sum of price of all books available in our book store, below will be the code for the same:

db.books.aggregate(
        [
                {$group : 
                    {
                        _id : "$Category", min_price : {$sum : "$Price"}
                    }
                }
        ]
);

These all the basic aggregation RDBMS functions that MongoDb also supports and with the code examples.

Back to top

What is the composition/structure of ObjectId in MongoDB? Explain in detail each composing element.

ObjectId in MongoDb plays a very special role. It associates with _id field, and MongoDb uses objectid as the default value of _id in documents.

As we know Object is of type BSON. Object is 12 byte bson type data structure. The composition/structure of ObjectId is as follows :

  • The first 4 bytes represents the seconds since last unix time.
  • The next 3 bytes after first four are the machine identifier.
  • The next 2 bytes after the machine identifier are the process id.
  • The last 3 bytes after machine identifier is some random counter value.

This represents the object id structure in a whole. To generate object id, MongoDb provides function as objectId(), syntax for the same is below :

ObjectId([SomeHexaDecimalValue])

Lets take example of creating ObjectId:

obj_id = new ObjectId()

The above statement will return the unique hexadecimal string containing object id as below:

ObjectId("6539h6hgt8721s97w45798j7")

We can also provide some unique hexadecimal string object id of 12 byte in method parameter, lets take an example:

Custom_obj_id = new ObjectId("2569j6hgt8621s97w45798j7")

There are some methods of ObjectId, below are the details :

  • str : provides string representation of object id.
  • valueOf() : returns the hexadecimal representation of ObjectId.
  • getTimeStamp() : returns the creation timestamp of objected.
  • toString() : returns the string representation of ObjectId in the “ObjectId(haxstring)”

Back to top

Explain GridFS in MongoDB? Give a practical example with source code for adding files to GridFS.

Let say we need to store large data files in MongoDb, how to do that, in a single document ? No, since MongoDb has limitation for a document to have maximum size of 16MB. Now how about storing data which has size more than 16 GB. In such scenarios GRIDFS comes to rescue us. GridFs is a MongoDb specification that enables us to store data that has size more than 16MB.  These large files can be some audio files or large images or might be a video file. In a way it is a kind of file system storage but still the data is store in MongoDb collections.

GridFS divides a large record ie a file into small chunks and it stores these chunks of data in documents, and each document has the maximum size of 255 kb.

GridFs uses two collections to store the large data, one collection is used to store the file chunks and other one is to store its metadata. These two collections are known as fs.files and fs.chunks to store file metadata and chunks.

When we want to retrieve the large dataset from MongoDb server, the MongoDb drivers reassembles the data from chunks and returns the data to calling function.

Syntax to store file using GridFs is:

mongofiles.exe -d <database_name> put <file_name>

To find the document in the database, find() method is used, below is the syntax for the same:

db.fs.files.find({filename : <file_name>})

Lets take an example to store a large file in mongo db server :

To store a file we need to traverse through the bin directory of mongodb installation:

Lets suppose we need to store the below file that is around 52MB in size. GridFS in MongoDBLets try to store this file using GridFS.Files using GridFS

As we can see the BookStoreDB has now the video file that is of 52 mb, and the file has been stored.

Lets try to find the file that we have just stored:Video File in MongoDB

As we can see in the output, we just got the file data from GridFs that we have stored.

To get all the chunks present, we can use the following command:MongoDB Commands

Running this file will return all the chunks. Notice we have used the files_id, as we got in the find command with chunks.

Back to top

How database relationship(1:1,1:N,N:1) is maintained in MongoDB? Explain with proper example.

Like relational database where records are relationally referenced in different tables maintaining the relationship as one to one (1:1), one to N (1:N), N to one (N:1), N to N (N:N). Relationship in MongoDB represents the way documents are logically connected to each other. In MongoDb these relationships are modeled in two ways :

  • Embedded
  • Referenced

Lets take an example of our BookStore application, where user can take one to N books on rent. Here in our database this relationship will be relationship will be in One to N (1:N).

Lets try to achieve this using the Embedded approach:MongoDB Inserts

As we can see in the example above we have inserted record with embedded approach, Here Alax user has two books Head First Java and Head First Design Patterns. In the embedded approach a single documents have the embedded records referenced. This approach have all the related data in the single document and if we need to find the whole document below will be the query to find one:MongoDB Find Command

As we can see from the query above, it resulted us the whole document that we have inserted.

So in essence in the embedded approach, we have all the related documents/records in a single document.

Now let’s move to another approach that is Reference approach :

In this approach instead of having all document in a single document, we will have separate document and these are referenced with ObjectId.MongoDB Reference with ObjectId

As we can see in the example above, the object ids are just dummy ids for demo purpose. In the next section we will be taking an example wherein we will insert two separate book records and we will be referencing these documents through their ObjectIds.

Lets try to store the Book documents and try to find to get the object id with which we will be referencing:Store Document in MongoDB

In the example above we have inserted two records for two books, Head First Java and Head First Design Pattern. And in the next step we have tried to find the records and we can see the inserted records in the BookStoreDB.

Now lets try to reference the documents to a user with reference approach:Referenced Way in MongoDB

This way we can store the records in referenced way in MongoDB.

Back to top

What are atomic operations? How automicity is achived in MongoDB, explain with example.

Atomicity is an important aspect of database that comes under ACID concept. NoSql databases have some difference with respect to handle atomicity as compared to traditional relational database systems and so as MongoDB. Lets try to understand what automicity is : Automicity is a concept where in while updating some records in the database either all records should update in a transaction or no record should update. Basically we can refer it to an atomic transaction.  What automicity garuntees is either all records of database will update in a transaction or no record will update, that prevents the partial updation.

MongoDb also supports automicity but as we discussed in some different manner. In MongoDB there is a constraint that only one document can be updated as part of a single transaction. There can be multiple documents in a single document and it can be updated keeping automicity, but if there will be multiple documents then automicity cannot be achieved in MongoDb, so in essence we can achieve automicity in MongoDb but on a single document.

So what if we still we want to achieve automicity on multiple documents, here you need to use two phase commit to achieve the same. But the recommended approach to achieve automicity is to have the embedded documents, ie. To have all the related documents in one place.

Lets try to understand the same with help of an example:

Lets suppose we have a book store and in our bookstore we are maintaining the total number of “Head First Java” books and the remaining number of books, also at the same time we are maintaining the record about the user who bought the book. So a buy operation from frontend, and the below actions will performed at backend :

  • Decrese the available number of books by 1.
  • Update the Buyer Information with the user details who bought this book.

Below is how the document looks like for the same:

{
    "_id":"sr888377jjfjj3333",
    "book_name":"Head First Java",
    "total_books":100,
    "book_category":"Computer Science",
    "available_books":78,
    "Buyer Information": [
        {
            "name":"Alex",
            "email_id":"alex@yahoo.com"
        },
        {
            "customer":"Jimmy",
            "date":"jimmy@yahoo.com"
        }
    ]
}

So as we can see we have embedded the Buyer Information document with this in order to achieve atomicity. Whenever a buy book request will made from front end, at database side first it will check for the available number of books, if the available number of books is greater than 0, then the available books count will be decreased by one and the buyer information will be updated in the embedded document, Buyer Information that is embedded with the main document.

To update a document in MongoDb we will use findAndModify() method. Let’s take an example with the scenario above how we can use the findAndModify() method:

>db.BookStoreDB.findAndModify({ 
   query:{_id: "sr888377jjfjj3333" , available_books:{$gt:0}}, 
   update:{ 
      $inc:{available_books:-1}, 
      $push:{Buyer Information:{name:"Bjorn",email_id:"bjorn.smith@yahoo.com"}} 
   }    
})

The above code fragment first checks that if the available books are greater then zero, if the count is greater than zero than in the update part first decrease the count of available books by 1 and add the buyer information in the Buyer Information embedded document.

Back to top

Explain MapReduce in MongoDb with example?

MapReduce is a concept of processing large set of data and return an aggregated result.

From MongoDb official site :
“Map-reduce is a data processing paradigm for condensing large volumes of data into useful aggregated results. For map-reduce operations, MongoDB provides the mapReduce database command.”

MapReduce is usually used where we need to process large datasets.

Lets go through the map reduce command in MongoDb:

db.runCommand(
{
    mapReduce : <Collection_Name>	
    map: function()
    {
         //map function
    },
    reduce: function(key,values)
    {
        //reduce function
    },
    {
        out: collection,
        query: document,
        sort: document,
        limit: number
    }
})

Lets go through each term used in command one by one :

map, maps value with key and emits a key,value pair.

reduce, reduces the key value pair and group all the values with same keys.

out, indicates the location to put the result.

query, indicates if there is any thing that needs to be selected based on some criteria.

sort, Boolean field, indicates that the result needs to be sorted or not.

limit, is the number of documents that needs to be returned.

Let’s now try to understand the same with help of an example. Consider a scenario where have a online portal and we are getting a kind of items from different companies. Typically our document structure is like:

{
	Item_name : “Sony Xperia-z”,
	Category : “mobile_phone”,
	Company : “Sony”
}

Using this type of recordsets we will use map reduce to do some stuff. Lets first insert some records in our online portal database.MapReduce in MongoDB

So our onlineportal database is ready and we have populated some records for MobilePhone category. Now Lets play with map reduce features :

Suppose we want to count the number the items from each company, below is how we will write command for the same using MapReduce:MongoDB MapReduce Commands

As we can see, we wrote a command used company in map and used the key in reduce function, with a counter. In results section we got the expected result that Company Apple have 5 products/items in our db, Samsung has 4 and sony has 4.

Now in another requirement we want to count the number of MobilePhones that have Price greater then 40000, lets see how we can achieve this :

We will use query in this case and we will try to find out the records that have price greater then 40000. Below is the example:Query MongoDB

As we can see, we have the results now and in the way we wanted, Apple has 2 phones that have Price greater then 40000, Samsung has 1 and Sony has 3. If you give a close look at the command that we have used here from the last example we have just added a new thing here that is query,  and added the condition what we required and map reduce gave us the results in a flash.

This way we can process a very large dataset in our application using MapReduce.

Back to top

What is capped collection in MongoDb? How capped collections are created in MongoDb?

Capped collection is a special kind of collection in MongoDb, what can have limit on collection storage. That means in this collection we can restrict the size of collection or we can put limit on size of collection, these special type of collection is named as Capped Collection.

Lets take a look at the syntax of creating capped collection:

db.createCollection(<Collection_Name>, {capped: Boolean, autoIndexId: Boolean, size: Number, max : Number})

The syntax is near about same as the syntax of creating collection. Lets understand the syntax first :

Collection_Name : Name of collection that needs to be created as capped collection.

capped : Capped is the Boolean flag, true if the collection needs to created as capped collection, by default the value is false.

autoIndexId : Boolean flag, used for autoindexing, if true indexes will be created automatically, false will say indexes will not be created automatically.

size : Size parameter says the max size of documents in bytes, it is mandatory field in case of capped collections.

max : max parameter says the max number of documents allowed in a collection. Size is given preference over size.

MongoDb provides a method isCappped() to check if the collection is capped or not. Below is the syntax for the same:

db.<Collection_Name>.isCapped()

Back to top

Give a practical example of creating Capped Collection in MongoDB?

Let’s try to create a capped collection and try to simulate with some number of documents:

Consider a scenario wherein we have a bookstore application and we are logging the user data, and we want this data shouldn’t go over 3 documents. So we will be creating a capped collection that will have of capped collection type and have the restriction of keeping 3 documents, just to simulate this our example will not have the actual log data but just the documents having dummy data.

Lets first start with creating a capped collection in our BookStoreDB:

Capped Collections in MongoDB

Here we have created a collection named Logs as capped collection and provided the max document as 3 and max size as 200Bytes. In next command we have checked with the method isCapped() that if the collection is capped or not.

Let’s try to insert data in our collection:Insert Data in MongoDB Collection

So till now we have created a capped collection with max size of 3 documents, we have inserted three documents and the same reflected in the find command. Now since the collection is size of 3 documents and its now reached its threshold, now if we add another document, the oldest one will be overridden by newer one.

Let’s create a new record and try to find the documents in the collection:

Find Document in MongoDB Collection

So we have inserted a new document, lets try to list the documents now:

Insert new document in MongoDB

So as we can see the old document of user John is overridden now, since the Logs collection is capped collection and of the max size of 3 documents.

Capped collections are useful for log files, these collections only allow updates on original document size which ensures that the document will not change its location on disk. The same is also a disadvantage as well since if the update go beyond the size then the update will fail. One more disadvantage is that we cannot delete a document from capped collection.

Back to top

Does MongoDb support regular expressions? If yes, explain searching in MongoDb with regular expression. Implement an example.

Regular expressions are used in software applications among various languages to find pattern from a string or from a document or from database. MongoDb also have support for regular expressions. In relational database systems we use like and % for pattern matching in string. In MongoDb as well the same can be achieved using pattern matching as well as using regular expressions.

Lets understand the same with example:

To start with this we will add some data in a collection. In our BookStoreDB, we are going to add some books with name, author and isbn number.Add Books to MongoDB

So in our allbooks collection, we have inserted some records for books. Now lets try to search in our collection using regex :

Syntex to search some string in document from json is:

db.<Collection_Name>.find( {<fieldname> : { $regex : <Pattern> }} )

Lets understand the syntax :

Collection_Name is the name of collection under which we need to perform searching.

FieldName is the name of key, whose value needs to be find with regex.

$regex is the regular expression syntax in MongoDB.

Pattern is the pattern which needs to be search.

Lets apply the syntax and try to search from the allbooks collection, where we need to find the book name which have “Java”.Regular Expressions in MongoDB

As we can see we got the results that have value as Java.

Now there might be scenario where we need to search for exact string, let suppose we have one more book that has name as “JavaScript In Web”, and if we will try to apply our search we will get the same in result as well, since JavaScript have the Java word in it. To avoid such scenarios there are some special characters available in MongoDb that comes in action to rescue, there are $ and ^.

^ (Caret) used to make sure that the string should start with the character given in pattern whereas $ used to make sure that the string should end the character given in the pattern.

If we want to make our search case insensitive then we need to use $options with our search.Regex in MongoDB

If we don’t want to use regex for pattern matching, then there is another option available that is to use /<pattern>/ in find command, below is the syntax for the same: Regex Patterns in MongoDBThis is all about pattern matching using regex in MongoDb.

Back to top

This mini NodeJS course will help you learn how to design your own eCommerce website using NodeJS, Express and Kraken. NodeJS is a brilliant open-source JavaScript runtime environment that allows developers to create powerful and dynamic server-side web applications.

In this project-based course, you will build an entire Bookstore from scratch. You will be able to add, edit and delete books to the backend and customers will be able to browse, add and delete books from their cart as well as purchase it using Paypal.

NodeJS Course
Take this Course Online Now

Hopefully, this series of MongoDB Interview Questions with detailed answers including source code will be an ultimate source for Interview preparation. Next we are going to cover more MEAN Stack related topic, so keep in touch 🙂

Top Technical Interview Questions and Answers Series:

The post Advanced MongoDB Interview Questions appeared first on Web Development Tutorial.

MUST Have Core Java Interview Questions – Part 2

0
0

Let’s continue with Part-2 of MUST Have Core Java Interview Questions and Detailed answers tutorial. Major topics covered in this Java Tutorial are Exception Handling in Java, Threading in Java and Synchronization, Access Modifiers and usage, thread pooling in Java, Complete Collection Framework and Inner Classes.

Java Interview Questions and Answers

Complete Java Interview Questions List

Courses Online

What are different kind of exceptions in java. Explain Runtime and complie time exceptions ? Explain try,catch,throw,throws,finally with example.

Exceptions start from the base class Throwable. Throwable has two hierarchies one is error and other is exceptions. An exception further has its own hierarchy and furthermore divides into Runtime (Unchecked) and all exceptions other than this runtime exception falls into Compile (Checked) exceptions.Exception Handing in Java

As we can see in the diagram above Throwable is the parent class from where all exception propagates. Error is basically an unwanted scenario in the code which will occur and the system will been able to recover from this. Like stack overflow or the heap dump error, which are not recoverable. On the other hand exceptions are the scenarios where in our system will be able to recover from it. I.e. we can handle these types of scenarios in our code.

Lets understand each of them with example.

Runtime (Unchecked) Exception:

Runtime exceptions are basically programming exceptions, which will occur during run of program. Lets say we are writing some mathematical programming code where we are have function which take two parameters , one as dividend and one as divisor.

package com.javatutorial.exceptionhandling;

public class RuntimeExceptionMain
{

    public static void main(String[] args)
    {
        int dividend = Integer.parseInt(args[0]);
        int divisor = Integer.parseInt(args[1]);
        double result = doDivide(dividend,divisor);
        System.out.println("Result is : "+result);
    }

    private static double doDivide(int dividend, int divisor)
    {
        return dividend/divisor;
    }

}

So we are taking parameters form console and passing them to the divide function, which divides and returns the result. By mistake someone has sent the divisor as zero. Ideally one should not send zero as divisor.Runtime Exceptions in Java

So we send two arguments as 12 and zero, lets run and see what we see in output.Output for Exceptions in Java

So we got divide by zero exception, which we got when we try to run the code with the arguments, we got the divide by zero exception, which is a kind of runtime exception in java. So in essence we got runtime exception when we try to run the code with wrong arguments and we don’t have any try/catch block.

Compiletime (Checked) Exception:

Checked exceptions are the exceptions which are occurred during compile time of the code. For example we are writing code where we are dealing with I/O. Some of the methods of File api throws exception which we need to handle in our code, if we don’t add handing for these exception by throws in the method signature or adding try/catch in the code fragment, our code will not compile. Lets take an example where in we will using the File api and we add the code from which we don’t have the handling for the thrown exception.

package com.javatutorial.exceptionhandling;

import java.io.File;

public class CompileTimeMain
{

    public static void main(String[] args)
    {
        File file = new File("c:/text.txt");
        file.createNewFile();
    }

}

Now if we try to compile the code using command prompt, it will not compile. If you are coding using IDE, the IDE will suggest us to handle the exception and mark this line of code as non-compliable. Lets try to compile the code using command prompt and see what happens:Compile Time Exceptions in Java

As we can see when trying to compile the code, compiler is explaining about the exception must be caught or declared to be thrown.

Lets talk about few keywords that are used in exception handling in java.

Try/catch: try/catch is used when there is possible exception in a code block and an exception is been thrown out of it or an exception can be occur out of this code block. In these kind of scenarios we use try/catch block. There can be multiple catch blocks with a try block, but the thumb rule is that exception can not be narrow down in the subsequent catch block. Example of try/catch block is below:

public class CompileTimeMain
{

    public static void main(String[] args)
    {
        File file = new File("c:/text.txt");
        try
        {
            file.createNewFile();
        }
        catch (IOException e)
        {
            e.printStackTrace();
        }
    }
}

throw/throws:

throw/throws is used when in a method we want to indicate the calling method that the code is throwing some exception. Throw used mostly when we want to wrap an exception to a particular kind of user defined exception.

Finally:

Finally keyword is used when we want to do some particular kind of task even after the exception is thrown out of the code. Finally code is always executed, except some particular scenarios where we use System.exit in any of the catch block.

Back to top

How to create thread in java, what are different ways to create a thread? Explain synchronization with example.

To create thread in java, there are two ways:

  • By extending Thread class
  • By implementing runnable interface

Let’s understand the same with example:

package com.javatutorial.multithreading;

public class Main
{

    public static void main(String[] args)
    {
        Thread t1 = new PrintThread();
        Thread t2 = new Thread(new PrintRunnable());

        t1.start();
        t2.start();
    }

}

class PrintThread extends Thread{

    public void run(){
        System.out.println("In there !! Creating thread with extending Thread class");
    }
}

class PrintRunnable implements Runnable{

    @Override
    public void run()
    {
        System.out.println("In there !! Creating thread with implementing Runnable interface !! ");
    }
}

In the example above we are creating thread with both extending Thread class and also implementing Runnable interface. We have created a class PrintThread which is extending the Thread class and in the run method we have printed a string. On the other hand we have also created  class PrintRunnable which is implementing runnable interface and we have overridden the run method of this interface and in the run method we did some dummy text.

If you see the code thoroughly, in the main method where we have instantiated both Thread, the class with is extending the thread class we have created direct object, since it is extending the thread class, where as the class which is implementing the Runnable interface, we have created a Thread object and passed Runnable object to it.

One we are done with the initiation part, all we need to do is to start the threads.

Upon running the code what we got as output is:Threading in Java

Synchronization in Java:

Synchronization is the concept of acquiring lock on an object. In java each object has a lock and to acquire the lock on an object we need to use a keyword that is used for this purpose only, that is synchronized.

By using this keyword we can acquire lock on an object, the scope of lock can be on method or on a particular piece of code.  It is always advisable to lock a particular piece of code instead of locking the entire method. Since if there will be lock on the method level then all objects will be kept on waiting stating until unless the running thread does not completes its task.

A part of synchronized keyword, Lock api does the same task. So we can use Lock api as well instead of synchronized keyword.

Back to top

What are different access modifiers in java, explain with example?

Access modifiers are the modifiers which provides access/visibility to class, method, field.

In java there are four access modifiers :

  • Public
  • Private
  • Protected
  • Default

Public access modifier provides object visibility to anywhere. Any object can access public class, public interface from anywhere. When we are saying anywhere it means from any class from any package. Public access modifier can be applied on class, methods, fields , constructor, interfaces and inner classes.

Private access modifier provides object visibility to no-where, other than the class. It is just reverse of public access modifier. Private access modifier can be applied on methods, fields, and constructor and inner classes.

Protected access modifier provides object visibility to same package or any other package where the class is been sub classed. Protected access modifier can be applied on methods, fields and constructor.

Default access modifier provides object visibility to same package only. Default access modifier can be applied on class, methods, fields, constructor and inner classes.

Lets check the same with some code stuff. We will be creating two packages to check the access, also we will add one class with four methods with four different access modifiers and we try to check how the visibility goes.

Lets start with creating CheckAccess class which has four methods with all four modifiers.

package com.javatutorial.accessmodifiers;

public class CheckAccess
{
    public void doCheckPublicAcccess(){
        System.out.println("Method with public access modifier, Accessed from outer class");
    }

    private void doCheckPrivateAcccess(){
        System.out.println("Method with private access modifier");
    }

    void doCheckDefaultAccess(){
        System.out.println("Method with Default access modifier");
    }

    protected void doCheckProtectedAccess(){
        System.out.println("Method with Protected access modifier");
    }
}

Lets create a Main class and try to access these four methods.

package com.javatutorial.accessmodifiers;

public class MainCheckAccess
{
    public static void main(String[] args)
    {
        CheckAccess access = new CheckAccess();

        access.doCheckDefaultAccess();

        access.doCheckProtectedAccess();

        access.doCheckPublicAcccess();

        access.doCheckPrivateAcccess();

    }
}

So we have added all four methods, lets try and run the code.

Upon running the code what we got is:Private Access Modifier in Java

So we got exception, since doCheckPrivateAccess has the private access modifier and doesnot have visibility to outer class other then the class itself where it is declared.

Lets test the same with other package. So we will be creating the same main class in other package and try to run the code.Main Check Access

So as we can see other than method with public access modifier, no methods can be accessed in this class which is other package. So it is as expected, now check for protected modifier which are accessible from other package where class is sub classed. Let’s modify our code and check:

package com.javatutorial.accessmodifierotherpackage;

import com.javatutorial.accessmodifiers.CheckAccess;

public class MainCheckAccess extends CheckAccess
{
    public void testAccess(){
        doCheckProtectedAccess();

        doCheckPublicAcccess();

        doCheckPrivateAcccess();

        doCheckDefaultAccess();
    }

    public static void main(String[] args)
    {
        new MainCheckAccess().testAccess();
    }
}

Upon compilation of this code what we got is:Java Access Modifiers

Only public and protected modifiers have visibility in this class. Public one because public has visibility all over and protected because protected access modifier has visibility in same package and other package where it sub classed.

Back to top

What is thread pool in java? Explain executor framework with different types of thread pools in java?

Thread pool, as the name suggests, it is a special kind of pool that maintains threads. Thread pool keep threads alive and not let them die. Whenever a task needs a thread, thread pool fetches the thread from thraedpool and allocates to task. Thread does its task and again comes into the pool.

So we are talking about die of thread, what is that special thing in thread that don’t keep threads to die. Or if we take the same in other way, when a thread dies. When we call thread has completed the task and it is no more alive now.

So we are talking about the run() method of thread. This method is responsible for keeping the thread alive, when a thread exits from the run method it is died. What thread pool does specially is that it don’t get the thread exit from the run method. This is so special about the thread pools.

To create thread in java is not an easy task behind the scene for vm. What thread pool does specially for vm is it just removes the extra thing that vm needs to do for creating threads separately. In java there is something called executor framework, which provides some special kind of thread pools. Using the executor framework the same can be achieved.

Let’s talk about the thread pools that executor framework provides. There are four kind of threadpools in java:

  • Fixed Size Thread Pool
  • Cached Thread Pool
  • Single Thread executor
  • Scheduled Thread Pool

Fixed Size Thread Pool

Fixed size thread pool is a thread pool, where a fix number of threads are available. Whenever any task arrives it is been allocated to a thread whichever is free at that point of time. If no thread is free at that point of time the task is kept on waiting until a thread is free. If any thread dies during run, then it’s executor functionality to ensure that the thread will be created.

Signature to create service with this kind of thread pool is:

ExecutorService executorService = Executors.newFixedThreadPool(<number of threads>);

Here 10 is number of threads that we want as part of this service. These can very as per requirement.

Threads in this thread pool dies once shutdown() is called, till then all threads in the threadpool are kept alive and they keep picking tasks.

Cached Thread pool:

Cached thread pool is a thread pool, where threads are kept in cache and they are created as and when needed.  If there are threads available and a task arrives then the threads are reused. Once a thread is done with the task then the same thread is kept into the pool. In order to make is more efficient and less resource consumption, the threads in pool are terminated after every 60 seconds, which are idle.

Signature to create service with this kind of thread pool is:

ExecutorService executorService = Executors.newCachedThreadPool();

This piece of code will create an executor where threads will be created as and when needed and idle threads will be terminated after a minute.

Single Thread Executor :

Single thread  executor is a thread executor  where exactly one thread executes a task. So it is guaranteed that one task will be executed at one point of time. If any task arrives when the executor is executing a task, then the arrived task is kept in a queue and as soon the executor completes the running task, new task got picked and is executed. This kind of thread pool is used when tasks are required to run sequentially.

Signature to create service with this kind of thread pool is:

ExecutorService executorService = Executors.newSingleThreadExecutor();

The above line of code will create an executor with a single thread.

Scheduled Thread Pool :

Scheduled thread pool is a kind of thread pool where threads can be scheduled to run at certain amount of time. Threads can also be triggered to run at certain period. In this case threads will run at a certain period.

Back to top

Continue with Java Interview Questions Preparation

What is collection framework, explain collection hierarchy? Briefly explain List, Set, Map, Comparator and comparable.

Collections in Java

Above is the diagram of collection framework. Collection interface sits on the top of the hierarchy, below this there are interfaces like List, Set, Queue that extends this Collection interface.  Below this in hierarchy are the Classes that implement these interfaces. Like ArrayList, LinkedList etc classes implements List interface. Whereas Hash Set etc classes implements Set interface. LinkedList, PriorityQueue implements Queue interface.

Interesting to see there is no Map interface in this hierarchy, isn’t it ? Map interface has its own hierarchy, and the reason behind it that Map works on key, value pair rest all collection classes works on value part only and not key value.

Let’s see how Map hierarchy goes: Map Heirarchy in Java

As we can see in the diagram, classes like HashMap, HashTable implements Map interface, since Map stores in key, value pair and not only the elements.

Lets start with List interface :

Whenever one wants to store elements in ordered sequence, that can be accessed based on index or based on iteration, List interface is used there. List maintains the insertion order and retrieval on list is also based on the iteration of the list. List store any type of objects and based on the object type if it is primitive List automatically box unbox the primitive data types. One more property of list interface is that list allows the null and duplicate elements that are not allowed in some of the data structures that we will talk later on.

Most common and most used implementation of list interface are LinkedList and ArrayList.List Interface in Java

The above are the methods available in list interface. Implementation of the same can be found in each and every implementation of List interface.

Lets move to set interface:

Generally we use set where we want no duplicate elements, HashSet is most common implementation of Set interface and most widely used.

Set has the property that is does not allows any duplicate elements, one null element is allowed but not more than one null element.

One more important thing to keep in mind is that, whenever we are using any custom object in Set, we must override the equals and hash code methods from object class these are utter important when dealing with the hash based collection.

Let’s now move to Map interface:

Map interface is used when we want some key value kind of relationship. This is the only reason that map does not fall into the standard Collection hierarchy. Since if you can see all the implementation of the Collection interface have only the value part and none of them has the key value mapping. So what if one needs key value mapping, here Map comes to rescue, Map provides key value mapping of the objects.

As we talked in the Set part, while dealing with Maps as well one must override the equals and hash code methods from object class and provide the implementation accordingly.

Whenever one dealing with sorting of collection, Comparable and Comparator are the collection that we needs to use. Both are used for sorting of the underlying collection.

It is all about the collection interface in brief.

Back to top

Explain are Inner classes in Java? When will you use an Inner Class?

Inner classes as the name suggests are the classes within classes. So there will be outer classes and inner classes concept. Inner classes will always be a part of outer class and they will be enclosed in outer classes.

Inner classes behave much more similar to a method in a class or a field in a class. Like there are members of a class same as inner classes will also be part of class within which the inner class in enclosed.

Usually we should avoid to use inner classes because class within a class and to read such kind of code is a bit hard, inner classes are good to write but at the same time they make your code less readable.

Also to maintain the code with such properties is not an easy task, like if there are some modifications in the class than one should have the full knowledge about the class how it was written and what the inner class in is has intended to.

Lets take an example of inner class:

package com.javatutorial.innerclass;

public class Employee
{
    String name;

    public String getName()
    {
        return name;
    }

    public void setName(String name)
    {
        this.name = name;
    }

    static class Department{
        int id;

        public int getId()
        {
            return id;
        }

        public void setId(int id)
        {
            this.id = id;
        }

    }
}

So we have created a class named Employee and there is an inner class called Department. Outer class have one field name and inner class also have one field id that is of type integer.

Lets see how this class can be used.

We will be creating a main class and we will try to use this class:

package com.javatutorial.innerclass;

public class MainInner
{
    public static void main(String[] args)
    {
        Employee emp = new Employee();
        emp.setName("Ahmad");
        Employee.Department department = new Employee.Department();
        department.setId(12);
    }
}

This is how the inner class can be used. As we can see the Department class is property of Employee class then the Department will be accessed can be only accessed with reference of Employee class only.

There is one more concept as well to create anonymous inner classes, let see how to create and use them.

This is how inner classes are created and used in java.

Back to top

This Java Tutorial Series is continued and you can find more Java Interview Questions in next Web Development Tutorial here.

Top Technical Interview Questions and Answers Series:

The post MUST Have Core Java Interview Questions – Part 2 appeared first on Web Development Tutorial.

MUST Have Core Java Interview Questions – Part 3

0
0

We are continuing with Part-3 of MUST Have Core Java Interview Questions and Detailed answers tutorial. Major topics covered in this Java Tutorial are Garbage Collection in Java, File Handling and Java I/O, Generics in Java, Hashmap details and performance improvements in it.

Java Interview Questions and Answers

Complete Java Interview Questions List

Udemy

Explain garbage collection with example? What are different parameters to tune GC?

Garbage collection is most important and most critical part of JVM. Whenever we create any object it is created on the heap area. When these objects keep on creating in the heap area, heap gets full and whenever on the full heap VM tries to put a new object, it does not allows and throw error.

This is same in C,C++ as well, where we need to remove the object or clear the space manually and need to create destructor to finalize object.

Java takes this part a step forward and provides garbage collector which automatically collects the unused objects and keeps heap space happy. So programmer while writing program needs not to worry about the object destruction part.

Java provides automatic garbage collection, and it just removes the objects that are not reachable anymore.

There are two kind of object state in Heap :

Reachable, these are the objects that are referenced.

Unreachable, there are the objects that are not referenced from anywhere.

Below is the diagram how the heap is divided:Garbage Collection Java Tutorial

This is how the head is divided into regions.  There are basically two regions in heap, these are Young Generation and Old Genearation.

Lets talk about both of them brief:

Young Generation : As the name suggests, young generation is the space where once the object is formed, it is placed in. Young generation is further divided into two regions that are Eden Space and Survivor Space. Eden space is the space where all the fresh or new objects are placed, once any new object is created with new, it will be placed into Eden space. We will talk about GC strategy afterwards but when GC cycle runs and any object that survives one cycle are moved to Survivor space and in Survivor space these objects are keep moving from one to other from each GC cycle. Some objects that became unreachable are garbage collected and some objects who are still reachable are exists in the survivor space.

Old Generation:  Old generation again as the name suggests where old objects are placed. So we have talked about the survivor space in young generation. Objects that are survived more than a threshold that is max tenuring threshold are moved to old generation.

Below is the GC parameter for this threshold:

-XX:MaxTenuringThreshold

Whenever any object crosses the number that is given in MaxTenuringThreshold, the same object is promoted to Old generation.

There are GC cycles as well, they kicks in when JVM sense low heap memory.

Minor GC Cycle is GC cycle that run periodically and collects the unreachable objects.  Whenever there is memory crunch and there is low memory then GC triggers major GC that runs on whole heap and collects the objects that are unreachable.

If your JVM continuously kicks major GC then there are possible chances of memory leak. In this case one needs to check application and find out the possible memory leak.

There are different kind of Garbage collectors available and we can use any of them with our application.

  • Serial Collector : Serial garbage collector is a garbage collector which runs with single thread and the same can be used for small applications.
  • CMS : CMS stands for concurrent mark sweep garbage collector. In this kind of garbage collector JVM continually does mark and sweep on the objects that are in the heap. This runs along with the application. One more thing about this garbage collector is that it doesnot stops the world, it just stops the world on mark/remark process. When we say stop the world it means that the application will be paused for a small amount of time.
  • Parallel: Parallel garbage collector is a garbage collector which uses multiple CPU’s to garbage collect from heap. Uses multiple CPU’s to mark and sweep. This garbage collector stops the world when it runs.
  • G1 : G1 stands for Garbage First, Introduced in java 7, this garbage collector divides the heap into small small regions. Regions with most garbage will be collected first.

There are different VM arguments to select the respective garbage collector:

For Serial GC:

-XX:+UseSerialGC

For Parallel GC:

-XX:+UseParallelOldGC

For CMS GC:

-XX:+UseConcMarkSweepGC

For G1 GC:

-XX:+UseG1GC

Back to top

Explain file handling in java, explain I/O in java, with example?

To deal with file system, java comes with I/o package, which provides a very rich library to interact with any of the file system. I/O basically stands for input/output. Java provides functions that deal with file system, whether creating a file, reading or deleting.

Lets talk about term Stream, that is very widely used term when we talk about i/o in java. So what is stream in java? Stream is basically a sequence of data that will be either reading by our program or our code will be writing, with is in a way input / output operation.

There are abstract classes present different kinds of stream that are ByteStream and CharacterStream. We will be using these classes when writing our code for input/output handling.

For ByteSteam java comes with InputStream and OutputStream, whereas for CharacterStream java comes with Reader and writer classes. For reading out of file system java comes with InputStream, whereas for writing OutputStream is used. For optimization BufferedInputStream and BufferedOutputStream are used.

Below is the hierarchy diagram of I/O classes:File Handling in Java

So this is how the file system hierarchy goes. Dotted one means there are multiple implementations but we have listed some of them. You can go through the java doc for all specification. But these are the implementations which are most widely used while dealing with file system.

Lets write code for creating file and write some data over it:

package com.javatutorial.file.io;

import java.io.*;

public class MainIO
{
    private static final String FILE_LOCATION="c:\\data\\tempfile.txt";
    private static final String DATA = "This is dummy data";

    public static void main(String[] args) throws IOException
    {
        MainIO main = new MainIO();
        main.writeFile(FILE_LOCATION, DATA);

    }

    void writeFile(String fileLocation, String data)
    {
        BufferedOutputStream outputStream = null;
        try{
            File file = new File(fileLocation);
            file.createNewFile();
            outputStream = new BufferedOutputStream(new FileOutputStream(file));
            outputStream.write(data.getBytes());
        }catch(IOException ioe){
            ioe.printStackTrace();
        }finally{
            if(outputStream != null){
                try
                {
                    outputStream.flush();
                    outputStream.close();
                }
                catch (IOException e)
                {
                    e.printStackTrace();
                }
            }
        }

    }
}

Lets understand the code first and then try to run and see what happens. What we have done is we first created File object and created a new file in our system. Once we are done with creating new file, we have to write some data in this. For this purpose we have used BufferedOutputStream, since as we have discussed earlier as well, BufferedOutputStream is optimized way while we deal with file system. After that we just write byte array to output stream which will actually write the data to our file system.

Lets run the code and try to find if it working fine:TempFile in System Path

So as we can see tempfile has been created in the given system path. Lets open and see if it containes the data that we have passed:Java TempFile

Allright, so we got the data what we wanted to write in the file. This was a very simple example of how to write data in a file using I/O library in java. In the same way using FileInputStream we can read the data from file system as well. Apart of these i/o library has a lot of methods to deal with file system. This is all about file handling in java using i/o library.

Back to top

Explain generics in java with example?

From java 1.5 a new concept is emerged that was generics and from then this was used very heavily in all types of applications. What was so special in generics and what does it solved. Lets understand in this section.

Basically generics provide some very useful features like type safety. Type safety is some thing which was not there in java before java1.5, type safety is a concept which says there is only and only one type of object is allowed in collection.

For example:

List<String> list = new ArrayList<>();

In the above example only String type of objects are allowed in this collection. If one tries to enter any object other than String complier will throw the error.

Here one more important thing of generics comes that is check at compile time and not run time. And this is another good thing which is these small types of thigs are detected at compile time and not at run time.

If one tries to add integer or some other object compiler will throw error and it is not allowed to do.

What if one tries to create a Generic class, let’s try to create on:

package com.javatutorial.generics;

public class Generic<T>
{
    T obj;

    void setObj(T obj){
        this.obj = obj;
    }

    T getObj(){
        return obj;
    }
}

So we have created a simple generic class with set and get the object. To create one we need to modify the class signature what we usually writes, and append a generic object term to it, in the example above we used it as T. T is the type of object what we will try to set and get from our main class.

Lets create our main class and test if our Generic class working fine:

package com.javatutorial.generics;

public class MainGenerics
{

    public static void main(String[] args)
    {
        Generic<String> objGeneric = new Generic<>();

        objGeneric.setObj("Test");

        String obj = objGeneric.getObj();

        System.out.println("Object :: "+obj);
    }

}

Executing the above code we got the output as:Generic Classes in Java

So we got what we set with the Generic class’s setObj method.

We can use generics on the method level as well like we used on class level.

Subtyping is not allowed in generics. Like we can not use subtype while declare with generics. Like we can not use Object and String as subtype in generics. For example:

List<Object> objList = new ArrayList<String>();

Writing the above line, compiler will complain and the code will not compile. Lets try to run and see what the above code will throw exception.MainGenerics in Java

Running the code will throw the above exception. Irrespective of String is subtype of Object, but the compiler will not allow to use the sub types in generics.

Back to top

Explain HashMap in detail, what are performance enhancements in HashMap in Java8?

Hashmap is a special kind of collection in java and why we use special kind of collection with HashMap is because unlike other type of collection, HashMap provides key, value pair type of collection which other collection doesnot provides.

HashMap works on concept of hashing. One thumb rule is while working with hash based collection is that when writing custom classes and use them as a key in HashMap, we should always override HashCode and equals methods.

And why these are important is because, based on the hashcode, there is one more method in HashMap class which again calculates hash for the object, just to prevent against poor quality hash code methods.

Below is the implementation of hash method from HashMap class:

final int hash(Object k) {
    int h = hashSeed;
    if (0 != h && k instanceof String) {
        return sun.misc.Hashing.stringHash32((String) k);
    }

    h ^= k.hashCode();

    // This function ensures that hashCodes that differ only by
    // constant multiples at each bit position have a bounded
    // number of collisions (approximately 8 at default load factor).
    h ^= (h >>> 20) ^ (h >>> 12);
    return h ^ (h >>> 7) ^ (h >>> 4);
}

As we can see, object’s hash code is used again in the HashMap class.

Based on the hash, bucket is defined, on which the object will be placed. So there are buckets which are simply an array. Index of array is calculated based on the hash value and based on the index the values are placed in the bucket.

One more important thing to learn is Entry class, Entry class is an inner class in HashMap, code of Entry class is as follows:

static class Entry<K,V> implements Map.Entry<K,V> {

    final K key;
    V value;
    Entry<K,V> next;
    int hash;

…

So we have just added a glimpse of Entry class to understand what this class does. There is a lot of code in this class, that you can found in the HashMap class itself.

So basically bucket has Entry objects. Entry class is basically a LinkedList, if you see there is a next variable in the class which contains the next pointer. Apart of this there are key and values that HashMap stores.

So why this Entry class is designed as LinkedList?

What we understand earlier is that, based on the hashcode that we have defined in our object, the index is calculated and based on the index the object is placed in HashMap. Now suppose, for two object same index is calculated. If there is same index and if there is already an object is placed in the bucket then will it be overrided ? No, because the Entry class is designed in such a way that if there are more than one object on the same index then these will be added in the Iinked list.

This is because the Entry class is designed as LinkedList.

Now Lets see code for put and get methods in HashMap class.

public V put(K key, V value) {
    if (table == EMPTY_TABLE) {
        inflateTable(threshold);
    }
    if (key == null)
        return putForNullKey(value);
    int hash = hash(key);
    int i = indexFor(hash, table.length);
    for (Entry<K,V> e = table[i]; e != null; e = e.next) {
        Object k;
        if (e.hash == hash && ((k = e.key) == key || key.equals(k))) {
            V oldValue = e.value;
            e.value = value;
            e.recordAccess(this);
            return oldValue;
        }
    }

    modCount++;
    addEntry(hash, key, value, i);
    return null;
}

So as we can see in put method, hash function is used to generate hashcode and the same hash is used to get the index for the bucket. One more thing, there is only one null key allowed in HashMap and the handling for the same can be seen in the method.

Lets see code for get as well:

final Entry<K,V> getEntry(Object key) {
    if (size == 0) {
        return null;
    }

    int hash = (key == null) ? 0 : hash(key);
    for (Entry<K,V> e = table[indexFor(hash, table.length)];
         e != null;
         e = e.next) {
        Object k;
        if (e.hash == hash &&
            ((k = e.key) == key || (key != null && key.equals(k))))
            return e;
    }
    return null;
}

So here we placed code for getEntry, which is been called from get method of HashMap. Here as well same as the put method, hash function is used to calculate the hash and based on hash the bucket is decided and based on bucket the Entry is fetched.

If you see the code of put and get closely then you will find the importance of equals and hashcode methods . And why it is very important to have them in the object that is being used as key in HashMap.

Now lets talk some about performance now, suppose there is very bad hash code designed and that returns the same value each and every time. In this case the bucket location of all objects will be same and the linked list will keep on growing. And once the the linked list grows then to retrieve the element is difficult because the complexity will be O(n) at that time. So what performance improvement being done as part of java8 is that whenever the linked list grows about a threshold the list is converted into a tree, and tree is red black tree, we will not go in the details of redblack tree but certainly the performance improvement will be there. Since the complexity of tree traversal is O(logn) . That is the performance improvement done as part of java8 in HashMap. This is all about HashMap in java.

Back to top

This Java Tutorial Series is continued and you can find more Java Interview Questions and answers in coming Web Development Java Tutorial here.

More Technical Interview Questions and Answers Series:

Udemy

The post MUST Have Core Java Interview Questions – Part 3 appeared first on Web Development Tutorial.

Design your Way Through 2.8 million Android Apps

0
0

2.8 Million Android AppsWith a whopping 2.8 million apps in the Android store, we all can wonder how difficult it is for people who are trying to make a mark in the Android app store. The more the number of options users have in front of them, the stiffer the competition grows for these app developers.

Mobile apps have taken a giant leap over a period of past 10 years. They are loaded with a lot of features and they render an alluring tour to the offerings. Thus, helping users to save a lot of their time and energy consumed in doing the task that is just worth few minutes. Now that you have decided to develop your own mobile app, you need to make sure that you are well equipped and versed with the nuances of the craft.

To begin with let’s just divide the making of a mobile app into two parts; say, user experience(UX) and user interface(UI).  Plus, before getting into the intricacies you need to get to know your targeted audience and market you are aiming at. Developing mobile apps is not about spending extravagantly on designing. All that matters is the incredible app interface that brings out the best out of your mobile app.

Moreover, it is expected that the success of a mobile app depends highly on the user experience.  And a ‘bad’ user interface will lead to a bad experience causing the reason of the failure of the app.

I do not advocate that design and interface of an app will completely overshadow the actual essence of the app. However, an intuitive interface packed in an eye-catchy design will surely work as a booster in the conversion.

Interface design is an intermediary between the functionality of interfaces, and it is a key feature in the user experience design. If you are wondering that designing a user interface design needs your full attention then you are absolutely right!

To begin your work you need to set up your Android Studio Layout Editor to the following settings:Android Studio Layout Editor

Move down to app > res > layout > activity_main.xml in your Android Studio’s Project window. To add space to your Layout Editor you can move on to hide the Project window. For this you need to select View > Tool Windows > Project (or you can even click Project option on the left-hand side of your Android Studio).

If there is an XML source depicted on your editor, then click on the Design tab present at the bottom of your monitor screen.

Then you need to click on the Show Blueprint option so as to look at the blueprint layout. Ensure that the Show Constraints option is on. The tooltip available in the toolbar must now read Hide Constraints.

Ensure to disable the Autoconnect. The tooltip available in the toolbar now reads Turn On Autoconnect. There is an option of Default Margins present in the toolbar and then you need to select 16 (it gives the designer to adjust the margin for different view later).

Click Device in Editor available in the toolbar and pick Pixel XL. On the bottom-left side of the window, you will get to see layout’s hierarchy of views known as The Component Tree window. In the picture, we the ConstraintLayout comprises of just one TextView object.

ConstraintLayout has defined the proper positioning for each layout view depending on the constraints applicable on the parent layout and to sibling views.This is the best way to create simple as well as complex layouts with the help of flat view hierarchy. The best part is that with this you do not nested layouts and thus saves a lot of time invested in drawing the UI. Now you can add components such as textbox and button accordingly.

Creating a responsive layout:

In order to make your layout flexible enough to fit into various screen sizes which mean responsive, you will have to stretch the text box stretch in order to fill the horizontal space left. You need to create constraint from the right-hand side corner of the button to the right-hand side of the screen’s parent layout. This will now be the total width available (which can be filled using the text box).

Likewise, you can incorporate constraint from the right-hand side corner of the text box moving on to the left-hand side corner of the button. You might feel that there is no need of the constraint there but this is equivalent to adding a bidirectional constraint between these views. This will constrain both the views to each other. This is known as a chain and it gives you options of some extra layout.

I hope these tips will help you to design a very great user experience and thus will in return work as a sales booster.

Author Bio:

Elley ALoy is a Professional Mobile App Developer works at Mobiers. Mobiers is a leading offshore android app  development company , backed by a strong workforce of 150+ iPhone experts offering high-performance iPhone / iPad app development services to help you surge ahead of the competition.

More Mobile App Development and Related Articles:

The post Design your Way Through 2.8 million Android Apps appeared first on Web Development Tutorial.

MUST Have Python Interview Questions

0
0

Here we are starting with a MUST Have Python Interview Questions with detailed answers explaining the concepts with the help of examples and source code. We will start with beginner level basic concepts and further take to  intermediate and advanced topics throughout this Python Interview Questions and Answers Series.
Python Interview Questions

Let’s Move on with Python Interview Questions and Answers

Below is the list of MUST Know Python Interview Questions with detailed answers:

Quick and Easy way to grasp Web, Database, Web Scrapping, Data Science, Web Visualization, Image Processing & More…
  • A Name Generator
  • A Website URL Timed Blocker
  • A Web Map Generator
  • A Portfolio Website with Flask
  • A GUI based desktop Application
  • A Webcam Motion detector
  • A Web Scraper of Property
  • An Interactive web-based Financial Chart
  • A Data Collector Web Application
  • A Geo Coding Web Service

Learn More Now…Click Here

How to Install Python and Prepare Environment?

Python increasingly becoming one of the most popular programming language among developers, especially for Machine Learning and research purpose. This is very easy and straight forward to learn python. The first step of getting started with python, is to install it. In this section we would describe the Installation Process for python in different environment.

How to Install Python:

WINDOWS:

  • Open the download page link on a browser.
    Installing Python on Windows
  • Download the installer package for Windows
    Python Installer Package for Windows Once the download is complete, execute the installer and once the installation s complete, open a terminal and run the following command.
    python -V
  • This will provide the following details.Python Interview Questions

MAC:

  • Open the download page link on a browser.
    Python Installer Package for Mac
  • Download the installer package for Mac OS X
    Python Releases for Mac OS X
  • Once the download is complete, execute the installer and once the installation is complete, open a terminal and run the following command to check if the installation is correct, which will print the version of installed python.
    python -V

LINUX:

  • Python is by default installed.
  • To check if the python is available, open a terminal and run the following command to check if the installation is correct , which will print the version of installed python.
    python -V

Back to top

What are the Key Features/Benefits of using Python?

There are several flexibility and uniqueness in Python that is contributing in order to make this language as one of the most promising language in the world:

  • The community is very large, therefore, there are lots of tutorial and learning material available
  • Easy to learn
  • Comparatively less code is required than any other language
  • Simple and straight forward
  • Machine learning and deep learning community as well as research work are using python extensively.

Benefits using Python:

One of the main argument in favor of python from python developer is that it as for being a dynamic-typed language needs no variable declaration, no explicit type conversion. As a result the same functionality can be implemented in fewer line of code than any other language. Development is quicker in python for this reason.

Python is excellent language for functional programming. Functions are like object, therefore, it is possible to assign them to any other class object or even return from another function as well as can be passed as parameter to other function.

For automation, Python is very popular.

Python is still number one language for big data analytics. Even though R has been designed specifically for data analytics however Python is still number one choice among data scientist for its simplicity and powerful computation tool.

The huge community and lots of opensource tools is another reason for growing popularity of python.

Back to top

Python Specialization from University of Michigan

How does the Ternary Operator work in Python? Explain with the help of a Real-Time example?

One of the most important as well as interesting feature of python is ternary operator. These are conditional expression in Python.

What is Ternary Operator?

These operators are used to evaluate any expression and provide output as either true or false. Some feature of ternary operator are as following:

  • It takes 3 arguments
    [<comparison expression> <result for true statement> <result for false statement>]
  • Example
    $result = ($x==1) ? true: false;
    So If x=1, $result = true otherwise $result = false.
  • This is a common concept across different programming languages. For example,  in Java this is the similar keyword as self.

How does the Ternary Operator work in Python?

In the following example, True and False can be used as the index of the dictionary as True =1 and False = 0.Python Questions

Therefore, True and False can be used as Boolean variable as well. As in the following example:Python Ternary Example

This is the beauty of Python, based on the context the variable can be used as different type.

The if-else block can be defined as following:Python Ternary Example Question

This is the magic of Python.

Back to top

What does the “self” keyword do?

The “self” keyword is a variable that refer to an instance of an object. When a class is created there is not explicit reference of the object of that class type, therefore in python in order to refer the current class or current object, self is used as a reference.

class User:
    def __init__(self):
        self.name = 'Muhammad Ahmad’
        self.age = 16
 
user_obj = User()
user_obj.name    # self.name holds 'Muhammad Ahmad' as value

Back to top

Define the following Items in Python?

Iterator:

Iterator are used for iterating through array:

for k in {"a": 1, "b": 2}:
    print (k)

Function:

Function is very interesting and can be used in so many different ways in python.

Creating a Function: 

The definition of function starts with the keyword “def” and followed by the name of the fucntion and finally it returns a result. In the following example, the name of the function is “square_of_first_ten_number” and it returns the square of 1 to 10.

def square_of_first_ten_number(n):
   return [x**2 for x in range(10)]

This function then can be used in any code segment of the complete program.

Pdb:

Pdb is the debugging module for python, here are some pdb commands for  debugging Python code.

  • To add breakpoint : <b>
  • To resume execution : <c>
  • To go through line by line debugging : <s>
  • To go to next line : <n>
  • To list source code : <l>
  • To print an expression : <p>

Generator:

  • A function that returns inerrable object
  • Used to control iterative behavior of a loop
  • it contains yield expression in the function definition, using yield expression it can iterate, however this can be done only once as the object is not persisted in memory
  • loop can be replaced with generators for efficient iteration over large dataset
    def  customgen(n):
        x = 0
        while x < n:
            x = x + 1
            if x % 4== 0:
                yield x
    
    for i in customgetn(100):
        print i
    The generator in the above example that iterates from 0 to n, and it yields the variable if the loop variable is a multiple of 4.

Lambda:

This is a normal method in python

def square(x):
   return x * 2

This method can be represented as a lambda

square = lambda x: x * 2

lambda can have e a number of arguments but execute a single expression.

Map:

  • Map accepts a function and a list
  • Map is equivalent to for loop
  • However for each iteration, it perform the passed function on each item of the list
  • It returns a list
    list = [1, 2, 3, 4, 5]
    def cube(x): return x ** 3
    list(map(cube, items))
    >>>>[1, 8, 27, 64, 125]

Filter:

  • Accepts a condition and a list
  • Iterate through the list and compute for each item if the condition is true or false
  • Return a subset of given list that matches the condition
list( filter((lambda x: x > 0), range(-5,5)))
>>>>>[1,2,3,4,5]
Reduce:
  • Accepts a function and a list
  • Iterate through the list and compute for each item and perform the operation specified by the function and aggregate the result
reduce( (lambda x, y: x * y), [1, 2, 3, 4] )
24
Static Method:

Static method are method from any python class those can be called from any part of the program without creating a object of the associated class.  From Python 3.6 there is a decorator to define any method as static method and later they can be classed just using the class name such as:

class Fruit(object)
	@staticmethod
	def generaldescription(x):
		print ("This is a static method of Fruit class with argument", x)

Fruit.generaldescription(2) # call static method from Fruit class

The output would be:Static method Output in Python

They can be also called on an object of the class, such as:

class Fruit(object)
	@staticmethod
	def generaldescription(x):
		print ("Fruit class with static method having argument", x)

Fruit().generaldescription(3) # call static method from Fruit class

The output would be as following:Python Static Function Interview Questions

Back to top

Continue with More Advanced Python Interview Questions and Answers

Python 300x250

What is Threading? Explain how multi-threading can be implemented in Python? Give an example of multi-threading using Python?

A thread is a small unit of program that can be scheduled in OS. Usually a program is forked to more than one parallel task and scheduled in OS for the execution of thread. Each process has at least one thread, however it can have more than one thread.

There are two specific kind of thread, such as

  • User- specific
  • kernel

How to Create a Thread in Python?

There are 2 module in python, such as

  1. thread
  2. threading

Using Threading Module:

from threading import Thread

t1 = Thread(target=execute, args=("Thread-1", 1, 5))
t1.start()

Here, target argument in Thread() is a callable function and  args are the argument for the callable function

def execute (name, delay, repeat):
    print("Thread: " + name + " Started")

    while repeat > 0:
        time.sleep(delay)
        print
        name + ": " + str(time.ctime(time.time()))
        repeat -= 1
    print("Thread: " + name + " Completed")

Some Features of Threading in Python:

Multithreading in Python

  • Thread share data and code with main thread
  • Multiple thread can co-exists in the same process and can communicate with each other
  • Multiple thread can execute code faster as they can run concurrently
  • For a single process each thread of its share the global data, therefore it need proper data-lock mechanism while multiple thread is manipulating the same data.

Example of Multi-threading using Python:

Here is an example, when Thread-1 is acquire a lock on particular interval and Thread-2 keep trying to acquire the lock, it can only acquire the lock when the lock has been released by Thread-1.

from threading import Thread
import threading
import time

data=0

def timer(name, delay, repeat, lock):
    print("Timer: " + name + " Started")
    global data
    while repeat > 0:
        time.sleep(delay)
        if(name == 'Thread-1'):
            while True:
                lock.acquire()
                try:
                    print('Locking')
                    time.sleep(1.0)
                finally:
                    print('Releasing Lock')
                    lock.release()
                    time.sleep(1.0)
        if(name == 'Thread-2'):
            num_tries = 0
            num_acquires = 0
            while num_acquires < 3:
                time.sleep(0.5)
                print('Trying to acquire')
                acquired = lock.acquire(0)
                try:
                    num_tries += 1
                    if acquired:
                        print('Try',num_tries, ': Acquired' )
                        num_acquires += 1
                    else:
                        print('Try ',num_tries, ': Not acquired')
                finally:
                    if acquired:
                        lock.release()
            print('Done after',num_tries,' tries' )
        print(name + ": " + str(time.ctime(time.time()))+":",data)

        repeat -= 1
    print("Thread: " + name + " Completed")


def main():
    lock = threading.Lock()
    t1 = Thread(target=timer, args=("Thread-1", 1, 2,lock))
    t2 = Thread(target=timer, args=("Thread-2", 2, 2, lock))
    t1.start()
    t2.start()

    print("Main proogram complete")


if __name__ == '__main__':
   main()

The output would be as following:

Timer: Thread-1 Started
Timer: Thread-2 Started
Main proogram complete
Locking
Releasing Lock
Trying to acquire
Try 1 : Acquired
Locking
Trying to acquire
Try  2 : Not acquired
Trying to acquire
Try  3 : Not acquired
Trying to acquire
Releasing Lock
Try  4 : Not acquired
Trying to acquire
Try 5 : Acquired
Locking
Trying to acquire
Try  6 : Not acquired
Trying to acquire
Try  7 : Not acquired
Releasing Lock
Trying to acquire
Try 8 : Acquired
Done after 8  tries
Thread-2: Sun Jun 25 22:53:53 2017: 0
Locking
Releasing Lock
Trying to acquire
Try 1 : Acquired
Locking
Trying to acquire
Try  2 : Not acquired
Trying to acquire
Try  3 : Not acquired
Releasing Lock
Trying to acquire
Try 4 : Acquired
Trying to acquire
Try 5 : Acquired
Done after 5  tries

  • Thread-2: Sun Jun 25 22:53:57 2017: 0
    Thread: Thread-2 Completed
  • Thread can be interrupted or can totally put into sleep for certain time.
  • Each data can have its own local data and local code
  • Thread run in the same process of the main program, it can run concurrently with main thread, so it is used for quick task or background task.

In the following example, two separate thread is performing two different operation on the same global data:

from threading import Thread
import time

data=0

def timer(name, delay, repeat):
    print("Timer: " + name + " Started")
    global data
    while repeat > 0:
        time.sleep(delay)
        if(name == 'Thread-1'):
            data= data+5
        if(name == 'Thread-2'):
            data = data*5
        print(name + ": " + str(time.ctime(time.time()))+":",data)

        repeat -= 1
    print("Thread: " + name + " Completed")


def main():
    t1 = Thread(target=timer, args=("Thread-1", 1, 5))
    t2 = Thread(target=timer, args=("Thread-2", 2, 5))
    t1.start()
    t2.start()

    print("Main proogram complete")


if __name__ == '__main__':
   main()

The output would be as following

Timer: Thread-1 Started
Timer: Thread-2 Started
Main proogram complete
Thread-1: Sun Jun 25 22:39:59 2017: 5
Thread-2: Sun Jun 25 22:40:00 2017: 25
Thread-1: Sun Jun 25 22:40:00 2017: 30
Thread-1: Sun Jun 25 22:40:01 2017: 35
Thread-2: Sun Jun 25 22:40:02 2017: 175
Thread-1: Sun Jun 25 22:40:02 2017: 180
Thread-1: Sun Jun 25 22:40:03 2017: 185
Thread: Thread-1 Completed
Thread-2: Sun Jun 25 22:40:04 2017: 925
Thread-2: Sun Jun 25 22:40:06 2017: 4625
Thread-2: Sun Jun 25 22:40:08 2017: 23125
Thread: Thread-2 Completed

Back to top

What is __init__.py? How to import class from different directory?

__init__.py is mainly used to initialize Python packages.Initialize Python Packages

the __init__.py file in a lstm_m directory indicates to the Python interpreter that this directory is to be treated like a Python package.

How to Import Class from different Directory?

Usually  __init__.py  is an empty file. Now if we want to use lstm.py in run.py file we simple need to import it as following:

Import Class in Python

And also there must be a __init__.py  inside the module folder that is intended to be imported.

Back to top

Python Certification Training

Explain different ways of Reading and Writing files in Python?

The most popular reason for using Python in order to process file, is that it supports streaming. For example, in order to read huge data set for big data analytics and process the file.

Usercase 1: Read all txt files in a directory

The yield command enables a function to comeback where it left off when it is called again. It took only 4 line to execute this processing.

for root, directories, files in os.walk(given_directory):
        for file in filter(lambda file: file.endswith('.txt'), files):
            # read each document as one big string
            document = open(os.path.join(root, file)).read()
            # returns a generator
            yield document

Usercase 2: Read a huge file using generator

def get_line():
     with open('filename') as file:
         for i in file:
             yield i

lines_required = 100
gen = get_line()
chunk = [next(gen) for i in range(lines_required)]

Back to top

How do we debug a Program in Python? Is it possible to step through Python code?

There is a built-in model ‘pdb’ which provide a interactive python debugger.

python -m pdb mypyscript.py

Run pdb from  interpreter

>>> import pdb_script
>>> import pdb
>>> pdb.run('pdb_script.MyPyObj(6).go()')
> <string>(1)<module>()
(Pdb)

From python script file

import pdb

class MyObj(object):
    count = 5
    def __init__(self):
        self.count= 9

    def go(self):
        for i in range(self.count):
            pdb.set_trace()
            print i
        return

if __name__ == '__main__':
    MyObj(5).go()

Back to top

Describe Python’s Garbage Collection Mechanism?

Garbage Collector:

As like Java, python also has its own built-in garbage collector, it release memory when any memory taken by any object is no longer is being used.  Now when garbage collector know the memory is not being used. Garbage collector use reference counter of object, if the reference counter of any object is 0, it is called dead object and it is ready to be cleared by GC.  However, this mechanism is called as referencing counting.  Referencing counting is easy to implement, however, it is not thread safe. If a object has been referenced so many times that is also stored in memory, therefore, for a single object it need to store name, reference counter and value which needs memory.Python Interview Questions

Another algorithm used by python to manage garbage collection is Mark and Sweep Tracing.

Cyclic Reference:

When two object reference each other. The reference cant not be deleted.  This situation is known as cyclical reference. Under this situation the reference counter for both x and y is ot 0, therefore even if they are not being used, however, it is not collected by garbage as both of them are unreachable.Cyclic Reference in Python

Mark and Sweep Tracing:

Any garbage collection algorithm must perform 2 basic operations. One, it should be able to detect all the unreachable objects and secondly, it must reclaim the heap space used by the garbage objects and make the space available again to the program.

The above operations are performed by Mark and Sweep Algorithm in two phases:

1) Mark phase

2) Sweep phase

Mark

This mechanism follows a depth first search to search each object and check its mark bit, which is assigned to 0 at the time creation, if that object is reachable from current object, that is marked as 1, otherwise the mark bit remains 0.

Sweep

So all the objects whose mark bit is still 0 are considered as unreachable object. And this mechanism clear off all the unreachable objects and thereby clears the heap memory. Now the mark value for all the reachable objects is reset to false for further garbage detection.

Back to top

The course is designed to cover web, database, data science, web scrapping, image processing, web visualization and much more.

Followings are few highlight about this Python Online Course:

  • Best Seller Udemy Online Course
  • 40,016++ students enrolled
  • 6,251 Review available
  • 23 Hours on-demand videos
  • 28 Articles
  • 36 Supplemental Resource
  • Access on Mobile and TV
  • Certificate of Completion
  • Lifetime Access
  • 30 days Money back guarantee
  • You can get the course at Discounted Price here.

Most attractive feature is 30 days Money Back Guarantee means there is NO RISK. If you didn’t like this Python Online Course, you can refund your money back within 30 days of purchase.

Take-This-Course

This was first part in Python Language Interview Questions and details answers.  We will explore more advanced concepts in following parts. Keep in touch.
Step forward in 2017: Build in-demand career skills with Coursera

More Python and Related:

The post MUST Have Python Interview Questions appeared first on Web Development Tutorial.


MUST Have Python Interview Questions – Part 2

0
0

Python Interview Questions

Continue with More Advanced Python Interview Questions and Answers

Below is the list of MUST Know Python Interview Questions with detailed answers:

Python 300x250

Explain how to make HTTP request in Python?

There are different ways to make http request:

Get Request using httplib2:

Here is an example session that uses the “GET” method:

>>> import httplib2
>>> http = httplib2.Http()
>>> response = http.request("http://edition.cnn.com")[0]
>>> content = http.request("http://edition.cnn.com")[1]
>>> print (response.status, response.reason)
200 OK
>>> print(content.decode())
<!DOCTYPE html><html class="no-js"><head><meta content="IE=edge,chrome=1" http-equiv="X-UA-Compatible"> …………..
>>> sport = http.request("http://edition.cnn.com/sport", 
                       method="GET")[1]

Post Request:

Here is an example session that shows how to “POST” requests:

>>> import httplib2, urllib
>>> params = urllib.urlencode({'id': 1, 'name': ‘john’, 'address': ‘dublin’})
>>> headers = {"Content-type": "application/x-www-form-urlencoded",
...            "Accept": "application/json"}
>>> http = httplib2.Http()
>>> request = httplib.request("somehost.com:80",method="POST", ...headers={"Content-type": "application/x-www-form-urlencoded",
...            "Accept": "application/json"}, body=urllib.parse.urlencode(params))
>>> response = request[0]
>>> print response.status, response.reason
200 OK
>>> content = request[1].decode()

Back to top

Describe how to connect to MongoDB. Explain Basic CRUD operation using Python.

Install python driver for mongodb with following command:

pip install pymongo

Create a python script with name dbconnect.py as following:

# import python driver
from pymongo import MongoClient

def dbConnect:
      client = MongoClient()
      client = MongoClient("mongodb://addressbook.net:27017")
      db = client.addressbook # addressbook is the database name
# accessing collection 
     mycollection = db.dataset

  • Insert Data with PyMongo
    There are two method to insert data to database inser_one() and insert_many() to add data to a collection. If dataset is a collection in addressbook database.
    Insert_one:
    >>> result = db.dataset.insert_one({'address': ‘140,summertown,london’})
    >>> result.inserted_id
    ObjectId('54e112cefba822406c9cc208')
    >>> db.dataset.find_one({'address': ‘140,summertown,london’})
    {u'address': ‘140,summertown,london’, u'_id': ObjectId('54e112cefba822406c9cc208')}

    Insert_many:

    >>> result = db.dataset.insert_many([{'address': ‘150,summertown,london’},{'address': ‘9,balnchardstown,dublin’}])
    >>> db.dataset.count()
    3

  • Find Document
    db.dataset.find_one({'address': ‘140,summertown,london’})
    {u'address': ‘140,summertown,london’, u'_id': ObjectId('54e112cefba822406c9cc208')}

    Use cursor to iterate all the address in the dataset collection of addressbook database:

    cursor = db.dataset.find()
    for address in cursor:
        print(address)

    Use cursor to perform logical and operation, this will print all document those have city= london and postcode=10075.

    cursor = db.dataset.find({"address.city": "london", "address.zipcode": "10075"})
     for address in cursor:
      print(address)

    If we want to perform an or operation the cursor would be as following

    cursor = db.dataset.find(
        {"$or": [{"address.city": " london"}, {"address.zipcode": "10075"}]})

  • Update data
    There are update_one and update_many two method  in order to update data:
    update_one:
    result = db.dataset.update_one(
        {"address_id": "101"},
        {"$set": {"address.street": "9 Coolmine,Dublin"}}
    )

    update_many:

    result = db.dataset.update_many(
        {"address.zipcode": "10016", "address.city": "Burlin"},
        {
            "$set": {"address.zipcode": "10016C"},
            "$currentDate": {"lastModified": True}
        }
    )

  • Delete Data
    The following command will delete all the address data where city = london.
    result = db.dataset.delete_many({"city": "london"})

Back to top

Python Specialization from University of Michigan

How does Python handle the memory management?

The different type of memory for python are as following:Different Memory Types in Python

Memory management is very interesting in python. There are 2 types of object which are

  • Primitive object like number or string
  • Container object such as dictionary, list or user defined class

Each object has a value, one or more name and reference count. For example, in the following example.Handling Memory in Python

10 is a python object, it has 2 name x and y and the reference count for the object is 2 as two name is referred to the object.

If we execute print(id(x)), it shows the memory location for x which is also the same memory location for y. Therefore  x and y both are name for same object ‘10’.

Now if we assign x to z , we can see that the memory location for z is exactly same as x and y which is actually the memory location for 10.

If we execute, print (x is y) => it will print ‘True’, as both x and y is referring to the same object which is 300.

If we execute ‘del x’, it will not delete the object, however the reference count for 300 will be decreased by one.

If we create another object w and give it value ‘car’, it would create a string object and will get different memory location.Memory Managment in Python

If we assign w to z, which was earlier assigned with x , which was a number, z would point to the memory location of w instead of x, and x is z => false.

Heap Memory and Stack Memory:

def main():
    x=300
    print(id(x))
    w=sqr(x)
    print(id(w))
def sqr(x):
    print (id(x))
    z=x*x
    print(id(z))
    return z
if __name__ == "__main__":
    main()

In this above example, under main method an object 300 has been referenced with name x.  and there is another function has been defined as sqr. For the above example, the output would be:

1036686092944
1036686092944
1036681129680
1036681129680

So in both function main and sqr, the x is referencing to the same memory location. And z as well as w are referencing to the same memory location. When sqr method is returned the reference z is no longer in scope, therefore the reference count of 90000 is reduced to 0 and the returned value is assigned to w and w also referenced to 90000, the reference count to w in increased by 1. Every function is executed on stack memory and each reference is also created in stack memory. However the object is created in heap memory.Python Memory Management

Back to top

More Python Related Tutorials:

Describe the following Data Structure in Python?

Hashtable:

This is a data structure which stores object as a (key,value) tuple.

hashtable = {}

hashtable[1] = "Summer"
hashtable[2] = "Fall"
hashtable[3] = "Winter"
print(hashtable)

The output would be:

Dictionary in Python

Dictionary:

  • Dictionary is as an un-ordered set of key: value pairs where keys are unique.
  • {} is an empty dictionary.
  • The dict() constructor builds dictionaries directly from sequences of key-value pairs.
    >>> dict([('a', 1), ('b', 2), ('c', 3),(‘d’,4)])
    {'a': 1, 'b': 2, 'c': 3, ‘d’:4}
  • Indexed by keys instead of range of number; keys can be only immutable e.g number, string or tuple with number, string or tuple; if a tuple is of mutable object that can not be key of a dictionary.
  • This can be sorted.

Collections:

Collections module has some subclass of its as following:

  • defaultdict: This is similar as dictionary, however, this is smarter than dictionary as if in case of any missing key in the dictionary, it creates the key and store the value for the key.
  • orderedDict: This data structure keeps all entries sorted by the order of the insertion.
    For example for a general collection as the following example:
    hashtable = {}
    
    hashtable[1] = "Summer"
    hashtable[2] = "Fall"
    hashtable[3] = "Winter"
    
    for key, value in hashtable.items():
        print (key, value)
    The output would be:Collection Output

    Another way of creating ordererdic is as following:

    import collections
    
    hashtable = collections.OrderedDict( [(1, "Summer"), (2, "Fall"), (3, "Winter")] )
    for key, value in hashtable.items():
       print (key, value)

  • Counter: This can count the occurrence of item in a collections. For example for the following code.
    import collections
    
    Fav_seasons = (
       ('John', 'Summer'),
       ('Smith', 'Winter'),
       ('Barak', 'Fall'),
       ('John', 'Fall'),
       ('Smith', 'Summer'),
       ('Ahmed', 'Autumn'),
    )
    
    favseasons = collections.Counter(name for name, season in Fav_seasons)
    print (favseasons)
    
    #hashtable = {}

    John has 2 favorite seasons, Smith has 2 favorite seasons and Barak and Ahmed each has 1 favorite seasons, therefore, the output of this program would be:Python Collections Interview Questions

  • Deque : This is a doubly linked queue. Therefpre , it is possible to add or remove items from the both end of the queue. Once interesting feature of deque is that it can be rotate, for example:
    import collections
    
    d = collections.deque(range(10))
    print('Normal        :', d)
    
    d = collections.deque(range(10))
    d.rotate(2)
    print('Right rotation:', d)
    
    d = collections.deque(range(10))
    d.rotate(-2)
    print('Left rotation:', d)

    The output would be:Python Deque Interview Questions

Back to top

What are Regular Expressions and how to use them in Python?

Regular expression is very important for data analysis and manipulation. Following table would introduce different sign used in python as well as all other programming language for regular expression.

Symbol Definition
^ matches the beginning of a string.
$ matches the end of a string.
\b matches a word boundary.
\d matches any numeric digit.
\D matches any non-numeric character.
(x|y|z) matches exactly one of xy or z.
(x) in general is a remembered group. We can get the value of what matched by using the groups() method of the object returned by re.search.
x? matches an optional x character (in other words, it matches an x zero or one times).
x* matches x zero or more times.
x+ matches x one or more times.
x{m,n} matches an x character at least m times, but not more than n times.
?: matches an expression but do not capture it. Non capturing group.
?=  matches a suffix but exclude it from capture. Positive look ahead.
a(?=b) will match the “a” in “ab”, but not the “a” in “ac”
In other words, a(?=b) matches the “a” which is followed by the string ‘b’, without consuming what follows the a.
?! matches if suffix is absent. Negative look ahead.
a(?!b) will match the “a” in “ac”, but not the “a” in “ab”.
Regular expression flag:
Flag Description
re.I Ignore case.
re.L Matches pattern according to locale.
re.M Enable multi line regular expression.
re.S Make the “.” special character match any character at all, including a newline.
re.U Matches pattern according to Unicode character set.
re.X Ignore whitespace and treats unescaped # as a comment marker.

Example: Validate Email Address

import re
email = abcdefg@gmail.com
email2 = abcdefg#gmail.com

k = false
if(re.match("^.+\\@(\\[?)[a-zA-Z0-9\\-\\.]+\\.([a-zA-Z]{2,3}|[0-9]{1,3})(\\]?)$", email != None):
   k = true
q = false
if(re.match("^.+\\@(\\[?)[a-zA-Z0-9\\-\\.]+\\.([a-zA-Z]{2,3}|[0-9]{1,3})(\\]?)$", email2 != None):
   q = true
print(k)
print(q)

The output would be:Python Regular Expression Questions

Back to top

Python Certification Training

Give some example of Functional programming in Python?

Here is an example of traditional square function in python:

def sqr(x):
    return x*x
 
number = [1, 2, 3, 4]
output = []
for i in number:
    output.append(sqr(i))

Now in functional programming a function take and input and generate output without any intermediate step. If we rewrite the above function as following:

def sqr(x):
    return x*x
 
number = [1, 2, 3, 4]
output = map(sqr, number)

In python map, filter, reduce, lambda are used for functional programming.

Back to top

Describe Python’s Exception Handling mechanism in brief?

Exception Name
Reason
Exception Parent class of all exception.
StopIteration If iterator has no next object to iterate.
SystemExit If system exit abruptly.
StandardError Parent class for all built-in exceptions except StopIteration and SystemExit.
ArithmeticError When there is an error in numeric calculation.
OverflowError Raised when a result of any numerical computation is too large.
FloatingPointError Raised when a floating point calculation fails.
ZeroDivisionError When there is a divition by 0 or module by 0 occur.Python Exception Interview Questions
AssertionError Raised in case of failure of the Assert statement.
AttributeError Raised in case of failure of attribute reference or assignment.
EOFError Raised when there is no input from either the raw_input() or input() function and the end of file is reached.
ImportError When the module  to be imported is not installed.Python Exception Questions
KeyboardInterrupt Ctrl+C caused this interruption exception.
LookupError Base or parent class for all lookup errors.
IndexError Similar to ArrayIndexOutOfExcerption in Java.
KeyError Dictionary is a container of list of (key,value) air. If the key is not found, this exception is raised.
NameError Raised when an identifier is not found in the local or global namespace.
UnboundLocalError Raised when trying to access a local variable in a function or method but no value has been assigned to it.
EnvironmentError Base class for all exceptions which are outside the Python environment.
IOError Raised when there is a file red/write error. Also raised for operating system-related errors.
SyntaxError Raised for any error in Python syntax.
IndentationError Indention is very important in python for each codde block. This error is raised when indentation is not correct.
SystemError If Python interpreter finds an exception. This can be handled in code as the interpreter does not exit.
TypeError Raised when any operation is intended to be executed on a wrong data type.
ValueError Raised when type conversation can not occur due to wrong value.
RuntimeError Raised when an unknown exception occur.
NotImplementedError Raised when an abstract method that needs to be implemented in an inherited class is not actually implemented.

Try-except-finally Block:

try:
 // do some operation
except  Error1:
    // catch exception of type Error1
except  Error2:
    // catch exception of type Error2
else:
   // execute this block when no exception is occurred
finally:
  // the final block excute at the end of try and except either there is an exception or not

Nested Try-except Block:

try:
 // do some operation
     try:
        // this is the nested try block
     except  Error1:
       // catch exception of type Error1 for nested try
    else:
       // execute this block when no exception is occurred
    finally:
       // the final block excute at the end of try and except either there is an exception or not
except  Error2:
    // catch exception of type Error2 for outer try block
else:
   // execute this block when no exception is occurred
finally:
  // the final block excute at the end of try and except either there is an exception or not

Try Block without Except:

Each try block must be followed by either a except of finally block.

try:
   // execute some operation
finally:
  // the final block excute at the end of try and except either there is an exception or not

Different Ways to Handle Exception in Python:

  • Catch exception argument: Exception or can be handled with argument. As in following exception, ‘car’ can not be converted to int and args of error object define the reason for exception.Catch Exception Argument Question
  • Multiple exception in same line.
    try:
       # some operation in thos blcok
    except (Erro1[, Erro2[,...ErroN]]]):
       # if any exception from the list occur , this block would be executed
    else:
       If there is no exception then execute this block

Throw Exception:

Raise command is used to throw an exception either user defined or built-in as following:

  • If the error type is not known, it is possible to catch all kind of exception.Throw Exception Interview Question
  • It is also possible to detect which kind of error has been raised.Detect Error Type
  • It is also possible to pass user defined argument for the thrown exception.User Defined Argument

Back to top

How Object Serialization works in Python?

Object serialization is a simple way to convert an object from format to others and at the same way later this converted form of object can be converted back to the earlier version of object. Python uses a particular mechanism in order to serialize object which is known as ‘pickling’. Using pickling an object can be converted to a binary object.

There are two steps in order to serialize an object:

  • Import the pickling module.
  • Call the dump method with the object as an argument.
    import pickle
    class User:
       def __init__(self, name, age):
           self.name = name
           self.age= age
    class John(User):
       def __init__(self, aget):
           John.__init__(self, “John”, color)
    john = Jhon(18)
    smith = pickle.dumps(john)

Here john and smith are two different type of object. Picling has been used to convert john to smith.

Similarly, way it is also possible to de-serialize the object:

John2 = pickle.loads( smith)

If we only want to convert any python object to json , there are the following two steps need to be executed:

  • Import JSON module.
  • Call dumps function from JSON module and pass the object as an argument.
    import json
    d = [{"name":"John", "age":"10"}, {"name":"Smith", "age":"15"}]
    e = json.dump(d)
    print ("json version", d)

Here, the python object has been serialized to a json variable , the output would be as following:Object Serialization Question in Python

Back to top

Describe Object Oriented feature in Python?

There are two main concept of object oriented programming language. Python also support them.

  • Inheritance
  • Polymorphism

Inheritance:

Any class can be extended from another class. And the child class can access the method of the parent class.Inheritance Question in Python

Following are some example of method access across parent class and child class.

class Fruit:
   def __init__(self, name, color):
        self.__name = name      # __name is private to Fruit class
        self.__color = color
 
    def getColor(self):         # getColor() function is accessible to class Car
        return self.__color
 
    def setColor(self, color):  # setColor is accessible outside the class
        self.__color = color
 
    def getName(self):          # getName() is accessible outside the class
        return self.__name
    
class Apple(Fruit):
 
    def __init__(self, name, color, taste):
        # call parent constructor to set name and color  
        super().__init__(name, color)       
        self.__taste = taste
 
    def getDescription(self):
        return self.getName() +" tastes  "+ self.__taste + " is " + self.getColor() + "in color"
 
c = Apple("Red Apple", "red", "sweet")
print(c.getDescription())
print(c.getName()) # apple has no method getName() but it is accessible through class Fruit

class GreenApple(Apple):
    def __init__(self, name, color, taste, typed):
        # call parent constructor to set name and color  
        super().__init__(name, color, taste)       
        self.__typed = typed
    def getTyped(self):          # getTyped() is accessible outside the class
      return self.__typed    
        
g = GreenApple("Green Apple", "red", "sweet",2)        
print(g.getDescription()) # greenapple has no method getDescription() but it is accessible through class Apple 
print(g.getName()) # greenapple has no method getName() but it is accessible through class Fruit 
print(g.getTyped())

The output would be as following:Inheritance in Python

Polymorphism:

In this following class diagram, both Window and Wall are of Structure type. Therefore, for both of them Structure is the parent class.Polymorphism in Python

So now if we run the following example:Python Structure Questions

The output would be as following:Python Structure Output

As the destroy method has not been implemented in the child classed in Window or Wall therefore, there is an exception has been thrown.  Now if the program is fixed and all the abstract methods are implemented as following the output would be:

class Structure:
    def __init__(self, loadbearing):    
        self.loadbearing = loadbearing
 
    def built(self):             
        raise NotImplementedError("Subclass must implement abstract method")
 
    def destroy(self):             
        raise NotImplementedError("Subclass must implement abstract method")
 
class Window(Structure):
    isOpen=False;
    def close(self):
       self._isOpen =False;
 
    def open(self):
         self._isOpen =True;
    def built(self):
        return 'Wall has been built properly with loadbearing.' 
    def destroy(self):
        return 'Wall has been destroyed properly.'    
 
class Wall(Structure):
    def built(self):
        return 'Wall has been built properly.'
    def destroy(self):
        return 'Wall has been destroyed properly.'    
 
  
structures = [Wall(True),
        Wall(False),
        Window(True)]
 
for structure in structures:
    print (structure.loadbearing)
    print(structure.built())
    print(structure.destroy())
    if isinstance(structure, Window):
     print(structure.isOpen)
     structure.open()
     print(structure.isOpen)

Advanced Python Interview Questions

Back to top

The course is designed to cover web, database, data science, web scrapping, image processing, web visualization and much more.

Followings are few highlight about this Python Online Course:

  • Best Seller Udemy Online Course
  • 40,016++ students enrolled
  • 6,251 Review available
  • 23 Hours on-demand videos
  • 28 Articles
  • 36 Supplemental Resource
  • Access on Mobile and TV
  • Certificate of Completion
  • Lifetime Access
  • 30 days Money back guarantee
  • You can get the course at Discounted Price here.

Most attractive feature is 30 days Money Back Guarantee means there is NO RISK. If you didn’t like this Python Online Course, you can refund your money back within 30 days of purchase.

Take-This-Course

We will soon add a small Online Test to enhance user skills. Keep in touch.
Step forward in 2017: Build in-demand career skills with Coursera

More Python and Related:

The post MUST Have Python Interview Questions – Part 2 appeared first on Web Development Tutorial.

Top 10 Tips to Prepare For a Web Developer Interview

0
0

Getting a job in web development today requires you to go through a comprehensive technical interview since employers not only want someone who knows how to code but one who has the ability to solve problems. Your experience and impressive CV can only tell the employer so much which is why you will need to adequately prepare for a web developer interview in order to stand out from other job seekers. It is important to note that just because you are a good developer does not necessarily mean that you will nail your technical interview. It will take you a lot of preparation to effectively demonstrate your coding skills to recruiters. Here are some tips to prepare for a technical interview especially a web developer interview including preparation tips for online technical interviews and related online tests.Top 10 Tips for Web Developer Interview

1. Thorough practice

As a developer, you will need to take time to practice for your technical interview ahead of time. Whether you have been coding for many years, you still need to practice since an interview environment is completely different from the working environment. You can follow here for a complete reference to web developer interview questions with detailed answers.

2. Research

The tech industry is extremely competitive today which means that to be hired as the best technical talent, you will need to master your technical interview. This involves researching the company’s interview process either through their website or published interview tips. The internet can be a good source of information where you can find question types as well as time limits.

3. Ask for help where necessary

A technical interview presents a perfect opportunity for you to show your employer how much you know about web development. You will not be expected to know everything hence being honest about what you do not know is important. You do not want to waste your time or the recruiter’s by pretending to know everything.

4. Over-communicate

Never assume that the recruiter can read your mind in a technical interview especially when working through a problem in a whiteboard style interview. Think out loud as this not only makes you understand the best way to approach a problem, but it will also make it easy for the interviewers to help you.

5. Avoid arguments and confrontation

Never argue with your recruiters even if you feel that they are wrong. Instead, turn the arguments into a conversation. This is important because it will keep you in good terms with the interviewer.

Web Developer Interview Questions with Answers:

6. Let the interviewer know about your best career achievement

During your web development career, there may be something that you consider as your greatest achievement. Be sure to describe it in a way that will make the recruiter feel that it is indeed an extraordinary achievement.

7. Ask “smart” questions

When presented with an opportunity to ask questions at the end of the interview, focus on making yourself look good by asking brilliant questions.

8. Profile yourself

Be sure to have a solid online presence which also involves establishing an active digital footprint. Highlight the most relevant information that includes your experience and education. For more professional communication, create your own profile on networking sites such as LinkedIn and Stack Overflow.

9. Learn how to cope with interview bias

It is normal for job recruiters to subconsciously or unintentionally hold biases or make judgments against you. Find a way to go beyond these biases by portraying your strong skills and attributes.

10. Be up-to-date

The technical industry is experiencing many changes and upgrades hence you must show your interviewers that you are up-to-date with these changes as well as industry trends as this shows your interest in the web development field.

The post Top 10 Tips to Prepare For a Web Developer Interview appeared first on Web Development Tutorial.


Latest Images